Getting rid of clothing may be hard to do when the garment is fairly new or it's an article of clothing you really like. Sometimes it takes time and luck to find clothing that looks fantastic on you and fits well so you may really want to avoid throwing it away. With a little creativity and some basic sewing knowledge, you can salvage damaged clothing and even enhance the way your clothes look. Use these sewing tips to get you started and back into the clothes you’d rather not throw away.
 Small Holes
Sometimes a small hole in an article of clothing can suddenly appear without you ever knowing how, or why, it got there. Often, a tiny hole in a garment is barely visible, but a hole barely there is still a hole that can detract from the appearance of a blouse, or a pair of slacks. To cover the open area and add some glitz to the garment at the same time, apply a spot of fabric glue to the back of a rhinestone and glue the shiny stone over the hole. Rhinestones look fabulous on satin and on denim jeans. After gluing the rhinestone in place, add additional rhinestones to the garment to create a design, if you like.
Large Holes
Cutting pants at or above the knee with a pair of scissors can easily eliminate large holes that appear in the bottom area of the pants. After removing the damaged area, you can then hem the pants. Consider trimming the pants with a piece of decorative trim while you’re at it. Although the pants will be shorter, you will still be able to wear them.
 Frayed Sleeves
If the edges of the sleeves on a long-sleeved shirt are no longer fit to be worn, make the sleeves shorter to eliminate the unsightly frayed edges. Hem the edge of the altered sleeves to create a clean finish. Wear the shirt under a sweater if you prefer long sleeves.
 Stains and Worn Out Areas
Depending on where the stain or worn out area is located, sewing an appliqué over the damaged area can be an excellent way to make a garment wearable again. Position your appliqué directly over the stain or worn out area and sew the appliqué on with a needle and thread that matches the edges of the appliqué. Note that some appliqués can be sewn on while others can be applied using a warm iron. Shop for the appliqué that best suites your needs and desires.
 Everyone has bad habits. Whether you aren't the best housekeeper, you cut corners on your work projects or you eat unhealthy foods while you are supposed to be dieting, everyone has bad habits. If those bad habits are part of your sewing experience, however, it may be time to say goodbye to them. Hopefully, you also have some good sewing habits that are helpful to your efforts. Below is a list of some bad sewing habits that people who sew tend to develop. If you have one or more of these habits, it may be a good idea to work toward changing the habit into a good one instead.
Thread Storage: Is Your Thread Out in Plain Sight?
Many novice sewers tend to leave thread out on the table. Even if you opt for a basket or small box that looks organized, it is still open to the air and the dust and lint that regularly floats through the room. In order to keep thread free of dust and avoid clogs to the sewing machine, thread should be stored in a sealed container.
Fabric: Do You Know What You Have Stashed at Home?
Some crafters choose to head to the fabric store and see what they can find. However, if you do this and don't check your current inventory at home, you may end up with fabric you already purchased. This means money spent on fabric you still may not have determined is good for a project. This means you have a lot of fabric laying around and no use for it.
Work Ethic: Do You Take Breaks or Work for Hours on End?
If you work on a lot of projects, you may get sucked into the project at hand and forget to take breaks. While this may seem like a good habit to be in, it actually is bad for you and the sewing machine. This isn't even considering the other household tasks you miss or meals you don't make. Hours at the sewing machine means your eyes get tired, your hands start to hurt and other parts of your body ache. This can mean the project suffers too. If you want a better result, it is a good idea to take breaks and give yourself a chance to recover from the time you have spent on the project.
Holding Sewing Pins: Do You Put Them In Your Mouth?
This may seem convenient, but it is a very bad idea. It is far too easy to swallow pins, which is not good for your health. Not only can the pins end up in your stomach, but you can accidentally inhale a pin into your lung, which can do a lot of damage.
Starting a New Project Using an Untested Technique
You may find a new technique for sewing that seems like a great idea. However, before you start a project using material that you have in limited supply, try taking extra material you don't have a use for and testing yourself and the new technique on that. In this manner, you can get a handle on the new technique, then you can have better results with the project where you want to see it used.
Fabric and Designs: Make Sure They Mesh Well
There is a reason to use specific types of fabrics for certain garments or specific designs. It is not helpful to try to use any fabric for a project, when that project would work best with specific materials. Certain fabrics are far too challenging to use for a project. Pay attention to the fabric suggestions on the pattern and save yourself some hassle.
Fabric Marking: When Ballpoint Isn't Your Friend
If you have a sewing room, make sure all of your ink pens are stored elsewhere. A water soluble pen and a chalk pencil will be the best tools to have on hand. Make sure to test to see if a water soluble pen will stain the fabric you are using for a specific project. If that is the case, then use the chalk pencil instead.
Fabric Scissors: Keep Them In The Sewing Room
In direct contrast to your ink pens, your fabric scissors should be stored in the sewing room. Likewise, they should NOT be used for items other than fabric. This dulls the scissors and makes them less effective when you are trying to cut fabric for a project. Keeping them in the sewing room keeps them safe for projects and avoids accidental use as well.
Measurement: Measure Twice, Cut Once
There is a reason old sayings get to be old sayings: they have a point. Even if you think you know the measurements for a certain project, take them again before you start cutting. You may find a change in the measurements or realize you made a mistake the first time. Either way, measuring twice saves on wasted material.
Sewing Machines: Create and Stick to a Maintenance Schedule
Lint and dust tend to build up in the moving parts of your sewing machine. If you ignore this important fact, your work could be ruined when the machine stops running. To avoid this, make sure you do regular maintenance on your machine. It is also a good idea to take it to a professional who works at an authorized repair shop when issues get out of hand.
Now that you know some of the common bad habits crafters pick up in regard to sewing, you may be able to avoid them. That can mean positive changes for your sewing projects and a boost to your budget.
If you have any other bad sewing habits you would like to share, please help your fellow sewists out and leave a comment below!
credit: so-sew-easy.com
 A detachable collar is perhaps the easiest way to “bling” an outfit and make it more elegant without having to go and spend a whole bunch of money on jewelry. A removable collar is also a great alternative to the current trend of chokers that are in every jewelry store these days –at least in my corner of the world.
 Here is a super easy way to make one that will take you only a short time, few supplies and little money to make.
When making this collar, you should take into consideration the venerable Fibonacci sequence which is a pillar of design
and even architecture. This sequence of numbers is found all around nature and using it in your designs will make them really stand out. We are more in tune with nature than you think and our brain recognizes balance and symmetry –which is illustrated in the Fibonacci sequence– and finds it beautiful. I have chosen to work with the number “5”, but “3” also works very well. Of course, as always, please do what you think works best for you.
Materials for the Detachable Collar:
You will be using a scrap of paper, but if you are buying online I need to give you the minimum amount stores will sell you.
- 1 1/4″ yard of 1 1/2″ Venice lace (this is the actual amount and this is the lace I used in the pictures.)
- 1/4 yard of fabric (satin, cotton batiste, linen), neutral color.
- 1/4 yard of light fusible interfacing
- thread to match
- 1 1/2″ yard of 1/4″ ribbon to match.
- 5 Swarovski pearls 5mm to 6mm (optional)
- french curve ruler (you should really get one of these if you're planning on building your pattern making skills)
- sewing needle
- pencil or heat erasable pen
Step one: Drafting the base
There is no pattern for this project, so I'm going to teach you how to draft a basic pattern yourself. The measurements given are for a person with a neck measurement that is 13 1/2″ to 15″. You'll be able to draft this pattern straight on the fusible interfacing but you can use paper to make the pattern if you like.
These measurements include a 1/4″ seam allowance on all sides.
Fold your fusible interfacing or paper in half. Working on the fold and on the horizontal line. Mark a line that is 2 3/8″ to the left.

Working on the vertical line. Mark a spot 3″ down.

Using your french curve ruler, join these two marks by making a curve.

Mark 2 3/8″ from the curve.

Using the curve continue to mark this measurement to make a curve that is 2 3/8″ from the first curve.


Use your french ruler to draw the curve and cut.
 Round up the curve with your french ruler.
 Fold back in half. At the neckline, mark a point 1/4″ from the edge. From this point to the opposite corner draw a line and cut.

Step two: Cut the fabric and the lining using your pattern
Cut on fold both fabric and fusible interfacing.
Sewing tip: If using satin, fuse the interfacing to the satin before cutting the fabric.
Step three: sewing the collar
Right sides together. Sew the bottom at 3/8″ if you are size 15 and 1/4″ if you are around 13 1/2″.

Sew the top at 3/8″ if you are size 15 and 1/4″ if you are around 13 1/2″. Trim the seam allowance by half.

Fold the ends 1/4″ in, iron and insert the ribbon.

Sew at 1/8″. At this point, you have a blank canvas. If you have a fancy embroidery machine, I suggest you add a border to your the bottom and top of the collar. I think it will look even more elegant.

Step four: Cutting and sewing the laceIf you are using another kind of lace than what is recommended, make sure your lace is stiff. You can use fabric stiffener before you make the flower if you need to.
If you're using the recommended lace, you will need to cut seven segments of the lace for five smaller flowers or eight segments of the lace for three larger flowers. You can, of course, vary this if you want. You could even do some large and some small but that is completely up to you.
For lace other than the recommended, you will need 7 1/2″ of lace for five smaller flowers and or 8 1/2″ of lace for three larger flowers. The lace needs to have scallops or edging that creates segments like the lace I used for the flowers to really form properly.

Thread the needle with four strands of thread. Make a knot at the end. Using a running stitch and sew the side of the lace making a circle.

Using the same kind of stitch 1/4″ apart, sew at the bottom of the lace and pull to gather the lace.


 Sew at least five times back and forth to secure the gathers.

 Put aside and make the rest following the same steps.
Step five: Sewing the flowers on your detachable collar
Find the middle of the collar and sew the first flower.

Sew the second one next to it and the next one to the opposite side of the first one. I think you know where I am going with this so just continue on. Work your way up the collar work from the center.
 I
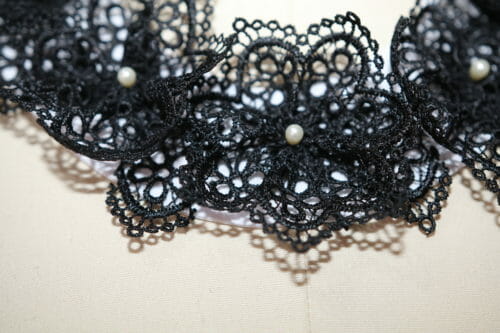
have cut some segments of lace off and will be adding them in the middle of the flowers so the white collar can not be seen too much.
I
have cut some segments of lace off and will be adding them in the middle of the flowers so the white collar can not be seen too much. Lastly, I have sewn some Swarovski pearls in the center of the flowers for a bit of pop and voila! A boring top becomes much more interesting!
As I finish this tutorial, I rummage in my box of lace and find some interesting candidates to make at least four more collars. I will be sharing these with you over the next few weeks. In the mean, see what you can find in your sewing stash to adapt this collar to your sewing supplies.
Until next time and happy sewing!
credit:so-sew-easy.com
Welcome to Episode 6 in the How to Sew A Skirt Sew-along series. The subject for today is: All about Zipper Feet

What do those Zipper Feet do?
If you plan to sew any kind of woven garment you will usually need to include a closure of some sort to allow you to get it on and off. Usually a dress or skirt will have a zipper.
There are three basic types of sewing machine zipper foot.
- The standard fixed zipper foot that may have come as standard with your sewing machine. (left)
- The adjustable zipper foot. (middle)
- An invisible zipper foot. (right)

All zipper feet allow you to sew one side or the other and get your stitches up close to the teeth of the zipper. You might sew on the outside rather than the center of the foot. Let's look at each of them in more detail.
Standard Zipper Foot (left)
May come as standard when you buy your sewing machine. The fixed zipper foot has a little notch either side for your needle so you can use it left or right handed to sew either side of your zipper tape. Best used for regular zippers with the teeth visible on the outside. This is my least favorite foot because you have to move it to the left or the right and so the pressure from the presser foot is always off center one way or the other and I find the fabric doesn't feed through so well and the foot doesn't always sit flat to the zip and fabric. Will work if this is the only one your have.
Adjustable zipper foot (middle)
The most versatile of the three. The adjustable zipper foot has many applications and can be used to sew almost any type of zipper. Also good for top-stitching and sewing in areas where the regular foot might be too wide. The foot can be positioned left or right, and you can adjust the positioning of the needle to exactly where you want it to be to allow for very close stitching.
You can also use the adjustable foot with an invisible zipper – simply flatten the zipper teeth as you sew just in front of the presser foot to sew as close as possible to the zipper teeth. If you don't have an invisible zipper foot, this one can work instead.
Invisible zipper foot (right)
In some ways, the least versatile because it can only be used for invisible zippers. However, if you give this foot a try you will love it! Sews invisible zippers with ease, again using a left or right hand channel and creates a beautifully close stitching line which will make your zippers truly invisible from the outside. Centers the pressure from the presser foot and uses a central needle position so feeding through goes smoothly and accurately too. Well worth adding to your sewing toolbox.

How to use your Zipper Feet
In the next post I will be showing you a step by step photo tutorial for how to sew an invisible zipper into our skirt project. However, before we do this, I HIGHLY recommend that you watch the free online video course from Craftsy – Mastering Zipper Techniques.
It's entirely free and the teacher is lovely. She shows you how to sew a regular zipper, an invisible zipper and a lapped zipper over the course of several short lessons. Watch them all, or just the ones you are interested in. Then you will be well prepared when it comes to sewing your skirt zipper.

Our next steps
- A quick recap of what we have completed so far –
- Overview, tools and equipment and choosing your fabric
- Drafting your custom fit pattern, and all about ease and seam allowances
- Cutting your fabric and pattern matching
- Marking darts perfectly
- Sewing darts perfectly
- All about zipper feet
credit: so-sew-easy.com
 A broken needle flying into the eye is a fear that seamstresses share all over the world. Something like walking into a spider web and not knowing whether the spider is stuck on your hair or lurking on the floor ready to strike –but potentially much, much worse. Those that have experienced the consequences of a broken needle often wear eye protection in the form of safety goggles or spectacles. To avoid this unfortunate incident, here are the main reasons why this happens and some best practice tips to prevent it happening to you.
Avoid pulling the fabric
This is a mistake made mostly by seasoned home sewers, because they are experienced and get distracted by music, internet or tv and cannot hear when the machines complains. The sound of the machine always tells you when it is working too hard or something is misaligned. Pulling the fabric will result in skipping stitches, a bent or a broken needle.

Below shows the correct positioning of your hands to avoid a broken needle. The feeder underneath the fabric is helping the fabric pass at the correct speed for the machine. Use your hands only to keep the fabric feeding straight and flat under the needle NOT to pull it through at a pace faster than the machine can handle.

Clean the sewing machine
Experts recommend that you clean your machine once a month. In fact it depends on how often you use it and the type of fabric you are using. If you use the sewing machine a lot, you may have to clean it more often.
Check the needle regularly
If you are familiar with the movie “The Usual Suspects“, then you may appreciate the comparison, at the end of the movie the small crooked man, the master mind of all the mess, turns into the smart, self confident shiny suit. In this scenario, the needle is the unusual suspect. Before we blame that blunt and bent little thing at the end of the shaft, we blame the tension, the timing, the fabric and even the thread –when most of the time the problem can be rectified by changing to a good quality needle.
Change your needle often especially after sewing thick or sequined fabrics. Use the appropriate needle and thread for the fabric you are working on.
Here is what often happens just before a broken needle:
- You have sewn over a pin or zipper
- The thread looks frayed
- You have skipped stitches
- Your stitches give your project a puckered appearance.
A clean and well-oiled sewing machine and a good quality needle will decrease the chances of injuring your eye and prolong the life of your sewing machine. It will also improve the creative satisfaction of your sewing while most importantly reducing the chances of injuring your eye.
credit: so-sew-easy.com
 If you get frustrated putting on binding because you sometimes miss catching the back of the binding and get little gaps – you need this article! Never miss the back again and get perfectly straight stitching – learn how to use the Binding Foot.
Do you remember that lovely big box of sewing feet I bought? I've been gradually working my way through them a bit at a time, with varying degrees of success. I'm never one for worrying too much about the accuracy of my sewing so these are certainly helping me get a great finish on all of my test pieces.

There is one in particular I wanted to share with you, the Binding Foot. This is a revelation! I now worship the binding foot and have been making up all sorts of little bits and pieces to add some binding onto.
Let's take a look at how it works
Features of the binding foot
The binding foot is adjustable so that it can deal with varying widths of binding. It works with bias binding and is perfect for use around gentle curves and circles, and it also works with straight cut binding for straight edges too. With some practice you can also use it to get neat mitered corners too – maybe once I get a bit more practice, a new how-to will follow to show you my tips for doing that. For now we'll assume we have to add binding to a straight edge, and will do it in a single pass, sewing front and back at the same time (perfectly).
There are two wheels on the foot. One so that you can adjust the position of the foot itself and slide it left or right and then another wheel that adjusts the width of the clear part of the foot that holds the length of binding. This controls a sliding guide that runs along the length of the binding as you sew and keeps it snugly in place against the guides for perfect stitching.

The plastic parts are flexible, especially when that lower wheel is turned to the wider setting, so that they can be opened wide to allow the fabric and binding sandwich to be put together.
Mine has numbers printed on indicating the width of the binding, but you don't really need the numbers. Just turning that wheel until the binding is snug is more important that using a number as a guide I think.

How to load the binding and fabric
Open up the lower wheel to move the guide over to the right hand side. This allows the upper and lower piece of the ‘jaws' to open up more easily. Now at this point, some tutorials I have read suggest feeding in your binding first and you can certainly try this and see if you get on OK that way.
Binding first method. Feed in the binding tape with the open edge on the left and the fold on the right. Separate the open edges and slide both the top and bottom edges inside the little tabs on the left of the jaws. This is how it should look with the fabric top and bottom separated and held by the little plastic guides.

Adjust that bottom wheel until the guide now moves over snugly to the folded edge of the binding so that the binding is held in place smoothly between the left and right edges, but without puckering.

Now open up the jaws with your fingers and slide in the item/fabric/garment/quilt to be bound. Push the edge right up to the fold of the binding. Slip the foot and binding up to the start of the edge to be bound. You are all set to sew.

Whole sandwich method. I found this one easier personally, so try each and see which you prefer. This time instead of loading the binding first and then the fabric after, I pinned the binding to the fabric and loaded it into the foot all in one go. Move the guide over to the right so you can open up the jaws easily. Near to the start of where you want to sew, pin or clip the binding to the fabric/quilt as if it were ready to sew, with a gap of 3 or 4 inches between your pins.
Now slide the foot in place around the whole sandwich, between those pins, and position the edges of the binding in the little guides on the left. Make sure the front and the back are lying in the guides smoothly.

Turn the lower wheel to move the right hand guide snugly up against the fold of the binding. It's all now in place and ready to sew. Remove the top pin, slide the foot back to where you want to start sewing and you are all set. Remove the lower pin as you sew.
I found this way less fiddly by loading the whole sandwich at once.

Stitching
If you have a machine with an adjustable needle – easy! Clip on the foot to your machine and adjust your needle to exactly where you want to stitch your binding. Pick right on the edge, or just back from the edge to be extra safe you won't miss a spot on the back.
If you don't have an adjustable needle position, then you will use the little screw at the top, loosen the foot and then slide it so that the needle position is lined up just right so sew along the edge of the binding. Then tighten the screw again.

Just manually drop your needle down into the fabric to check you are happy with the placement. Assuming you are, then you are ready to sew. Your foot may be pretty flat or it might be like mine. With my binding foot, the front plastic part is at an upward angle as it faces me. The presser foot itself is of course flat against the bed of the machine and the feed dogs, but in order to feed my sandwich into the foot, it worked best for me to hold it up at a slight angle to feed in.

Now just sew merrily along, make sure the binding stays in the little guides and that the fabric or quilt in between the binding stays butted up close to the fold and let the foot and the machine take care of the rest. What do you get? Perfectly sewn binding front and back, a perfectly straight line of stitching, and no missed bits when you turn it over – genius!


So if it drives you crazy when sewing on binding, that you turn it over and find you missed the back in a couple of spots, make your sewing life easier with one of these binding feet. Get it in the super-set of presser feet above, like I did or you can of course buy them separately too.
credit: so-sew-easy.com