Monday, September 28, 2015

DIY Tutorial | Bows & Buttons Dress

Bows & Buttons Dress by Mon Petit Four {tutorial}

So I have a small admission to make. I have had this dress floating around in my head for the longest time. So long in fact, that when it first came to me, I was planning on making it for my daughter out of her father’s old jeans. As you might be able to tell, my little girl is no longer the size of a jean leg! I am still entirely convinced that the used jeans option is a viable one, I just need a little baby girl to test it out on (cue husband having a heart-attack at the thought of a third child!).
Bows & Buttons Dress by Mon Petit Four Collage
One of the amazing things about living in Paris is the fabric district in the Place Saint Pierre. Unfortunately one of the less amazing things about living in Paris is that that is the only place to get a great range of fabrics. My local fabric store has a very limited range, but unwilling to drag myself all the way to the base of Montmatre,  I ended up instead dragging myself to our neighbouring town. The fabric I chose was a softened denim and was actually not as stiff as I had thought, so I needed to use a little iron-on interfacing to strengthen the bodice.
Bows & Buttons Dress by Mon Petit Four 2
I love how it turned out, and actually the softer denim makes it a very comfortable dress for Miss ChloĆ© to play in, which is important considering how sticky hot this Summer is starting to feel! I do feel however, that the dress would have looked better if I had placed the bow a little higher on the bodice, but I’m sure that’s something I can fix next time.

Bows & Buttons Dress Tutorial

You will need:
A sewing machine
0.5m – 1m of fabric (I used a soft denim)
2m of broderie anglaise
Iron-on interfacing
8 buttons

Step 1

Bows & Buttons Dress by Mon Petit Four {step 1}
Using an existing dress as a base, I traced around to find the shape and size of the dress I wanted to make. You should make sure you straighten off the neckline. Cut out two of these dresses (wrong sides facing), then cut the bottom 3-4 inches off of these pieces. Cut out two pieces to line the inside of the dress upper. Cut out 2 long strips approximately 10 inches (26 cm) by 2 inches (this will form our bias tape for the armholes). Finally cut out your front panel. This should be the same width as the neckline, and the same length as your dress (my advice is to play around with it before cutting it to make sure the bow is going to be large enough for you).

Step 2

Bows & Buttons Dress by Mon Petit Four {step 2}
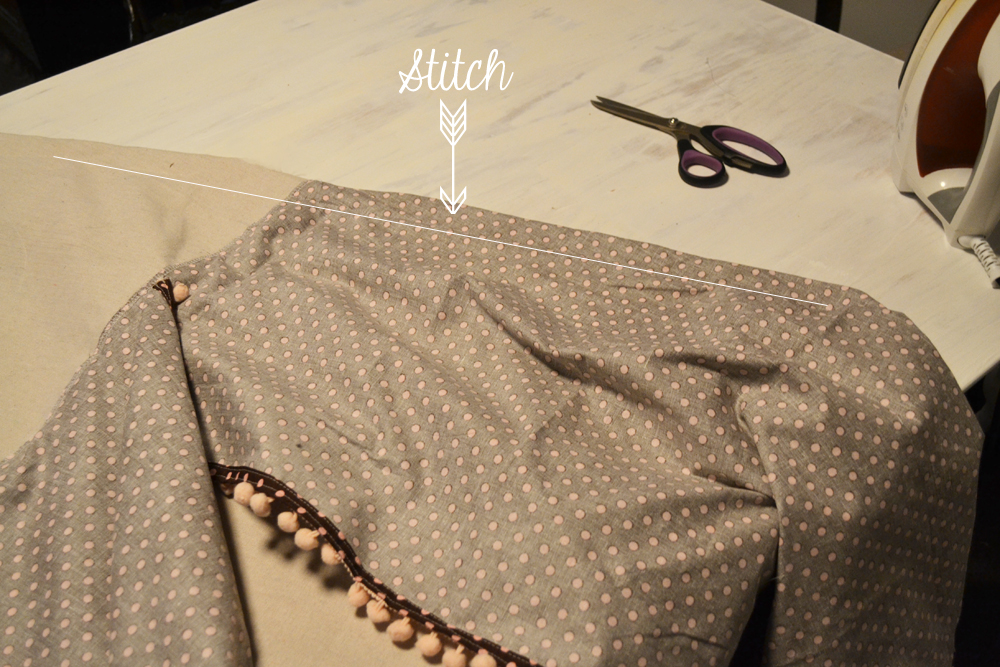
Place the broderie anglaise (right side facing up) onto the right side of the base segment of the skirt. Stitch this into place using a straight stitch. Match the skirt base to the top part of the dress, wrong sides together sew this in place. Open out and iron flat.
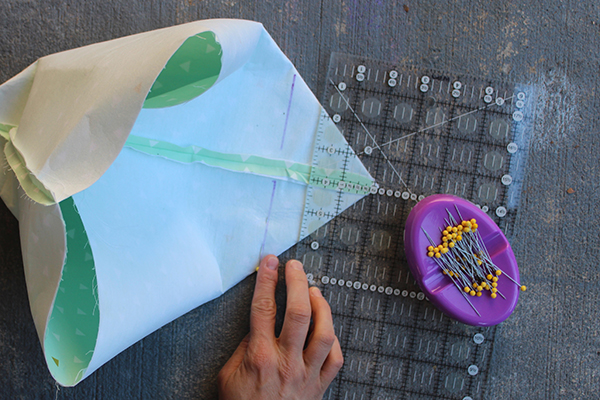
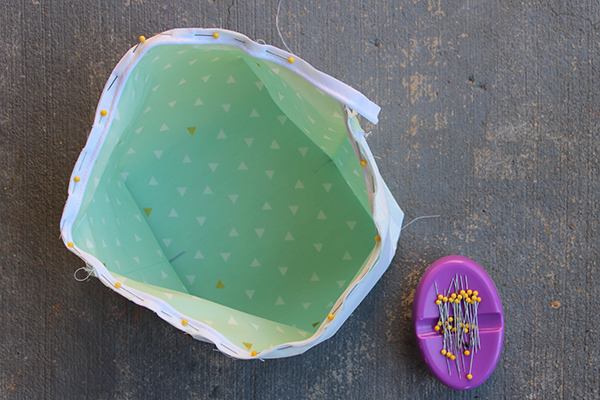
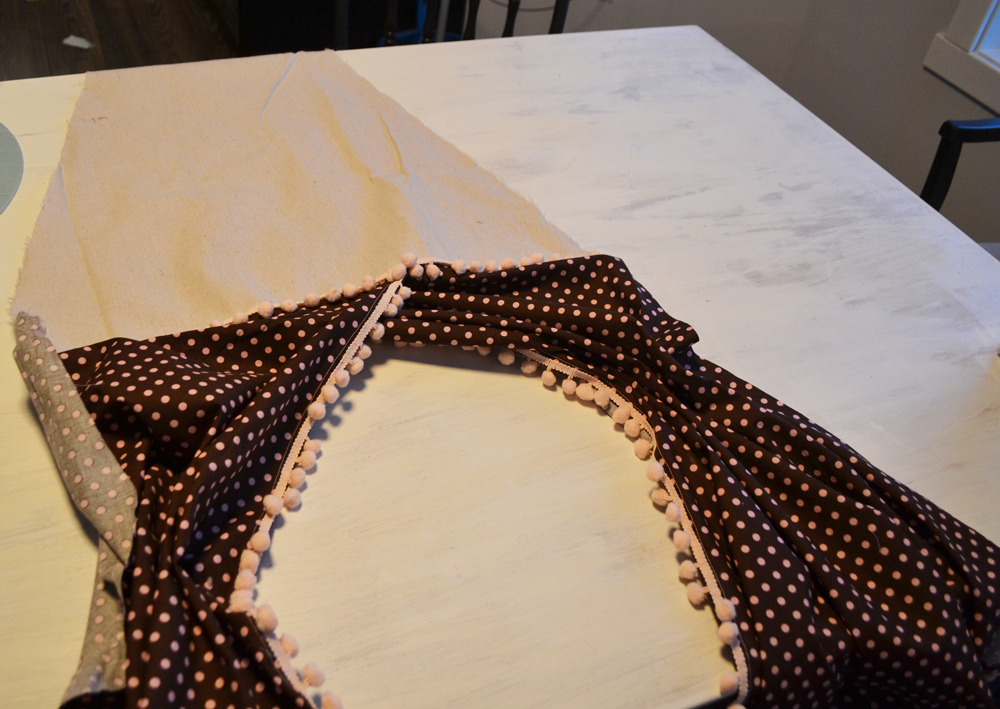
Step 3

Bows & Buttons Dress by Mon Petit Four {step 3}
Iron interfacing onto the two lining panels. Place the lining panel right-side down onto the right side of the dress panel (like on the left in the picture above). Stitch along the neckline. Turn lining panel over to the inside and iron the seam flat.

Step 4

Bows & Buttons Dress by Mon Petit Four {step 4}
On the long strips, fold long edges into the centre and iron flat. This creates a bias tape that we will use for the armholes.
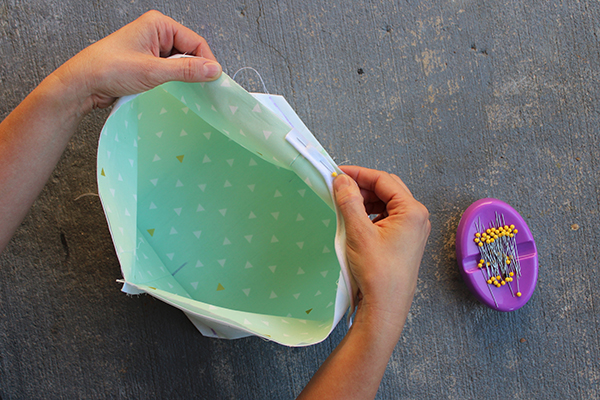
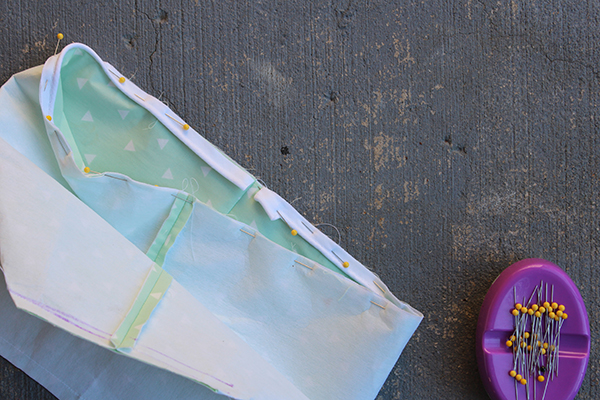
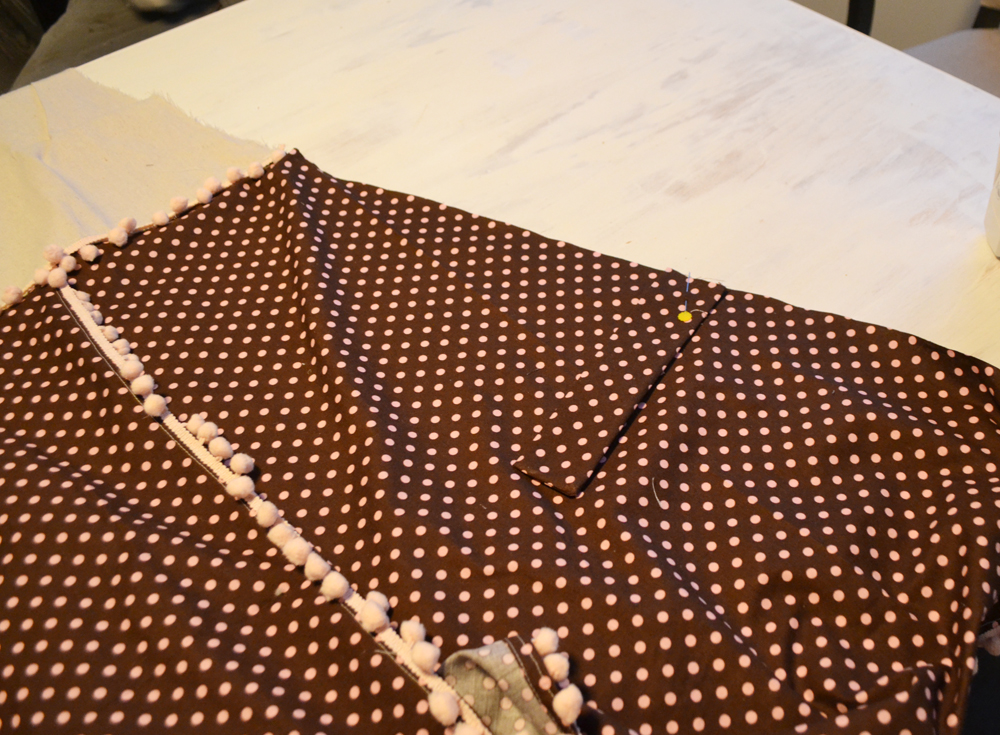
Step 5

Bows & Buttons Dress by Mon Petit Four {step 5}
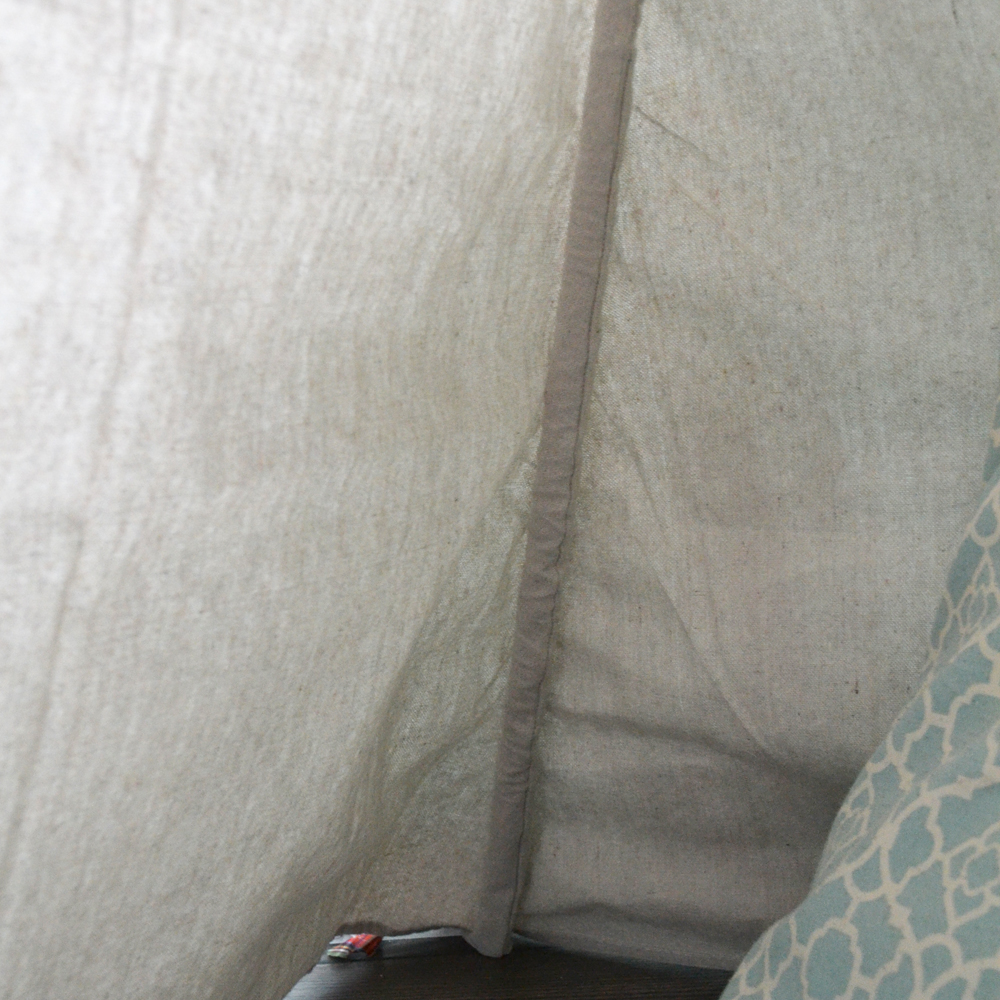
Fold bias tape over the armhole edges and pin into place, from the top of bottom of the arm hole on the back panel of the dress to the bottom of the armhole on the front dress panel. Make sure you have measured the shoulder height from the neckline. Stitch along the inside edge of the bias tape, making sure you catch all the inside panel pieces as you go. Repeat on the other side. You should now have a piece that looks like the one above.
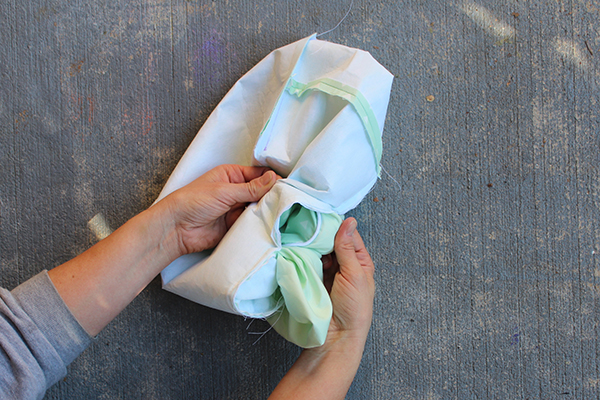
Step 6

Bows & Buttons Dress by Mon Petit Four {step 6}
Wrong sides facing inwards, sew along the side edges of the dress panels, making sure the ends of the bias tape are sewn inwards also. These can now be trimmed. Turn dress right-side out.
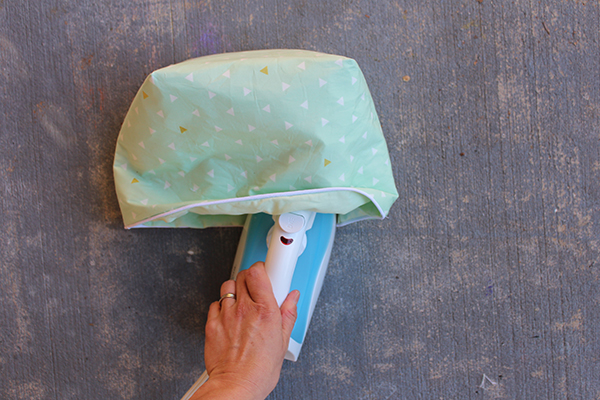
Step 7

Bows & Buttons Dress by Mon Petit Four {step 7}
Hem the top and bottom edges of the centre panel. Next, sew the broderie anglaise (right-side facing down) along the long edges of the centre panel. Turn right-side out and iron flat.
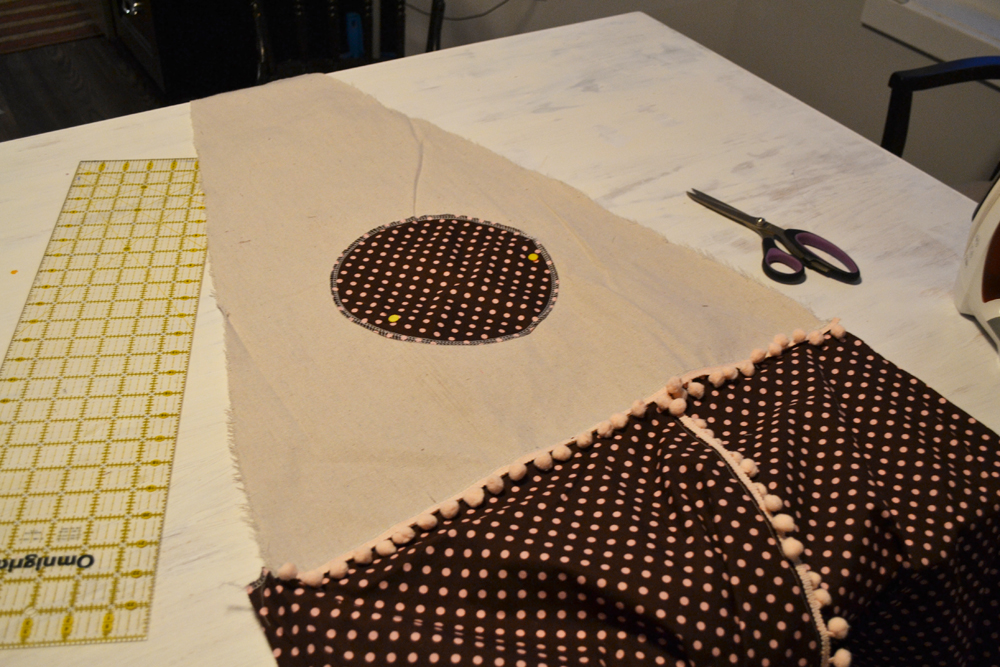
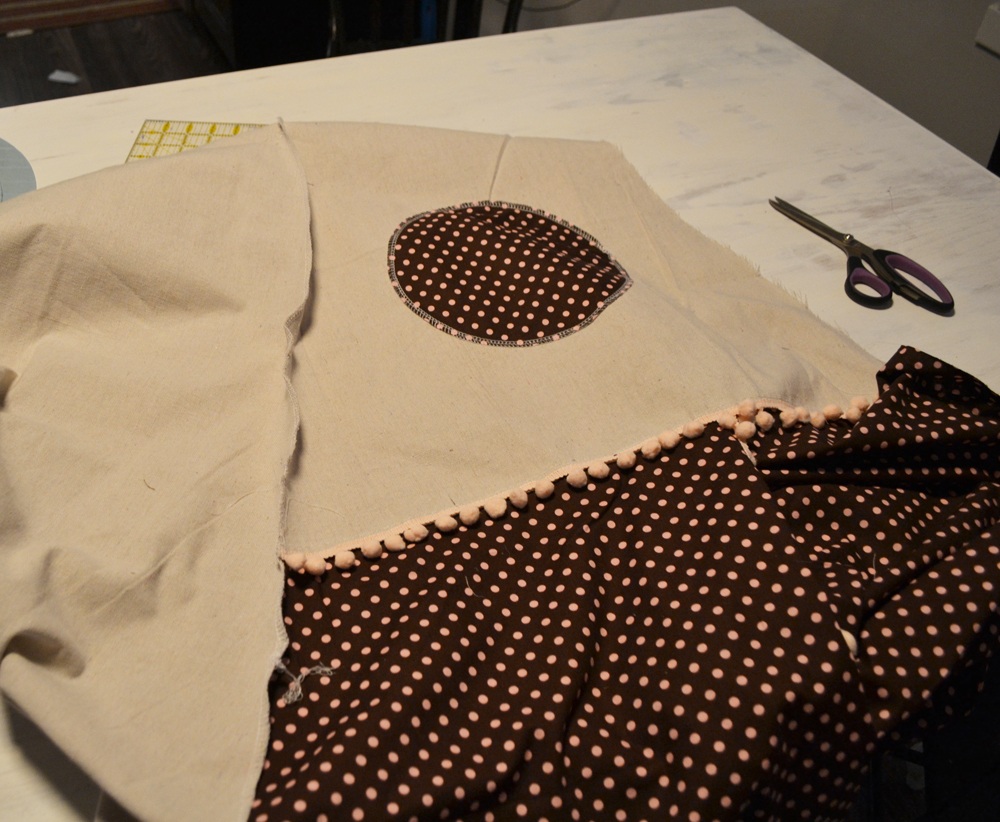
Step 8

Bows & Buttons Dress by Mon Petit Four {step 8}
Position centre panel by lining up the bottom edge with the broderie strip at the base of the dress. Fold top edge over and back onto itself to create a small rectangular section at the top of the dress. Pinch this in the centre to gather it and hand stitch to fasten. This creates our bow.

Step 9

Bows & Buttons Dress by Mon Petit Four {step 9}
Fix centre panel into place sewing buttons along each edge. You could also top sew this panel into place, but I personally didn’t want the extra line of stitching.
Finally hem the bottom of the skirt to your desired length.
Bows & Buttons Dress by Mon Petit Four 3

DIY Tutorial | How to attach Lace on Curtains

We recently started working on our master bedroom makeover and I have been on the hunt for the perfect curtains. As soon as I saw the Ombre Lace Curtains from Anthropologie I was in LOVE! The $188 per panel price tag . . . not so much. That makes them nearly $400 for both panels, yikes!
Anthropologie-lace-curtains
I have a bunch of doilies but unfortunately not enough to add to two 95″ panels, so I started to price out some doily style trim instead. I quickly realized that could get pricey {or at least more than I wanted to spend} and hit a road block. Then I had an idea…. I still had some lace runners leftover from our wedding reception last October {which you can check out here}. I had left more than half of them at the venue for future brides to use but was hoping I may have enough for the curtains.
diy-upcycled-lace-table-runners-into-curtains-before-upcycledtreasures
I only had 4 runners but I laid them out flat to measure how long they were all together. I knew I would basically have double the length because I could cut them in half. Luckily, I had JUST enough, yay! Of course I didn’t have any curtains to add the lace too, but I did have a Bed Bath and Beyond gift card with about $25 left on it so I headed there to see what I could find. Normally I don’t have much luck finding the 95″ curtain panels there in the style AND price that I want, but this must have been my lucky day. I found what I thought were perfect AND they were on sale for $40 for BOTH panels, woo-hoo! So after my gift card and 20% off coupon I was able to pick up 2 panels and only spent $20 out of pocket. Score!
curtains-panels-on-sale-for-diy-lace-curtains-upcycledtreasures
I wanted my lace runners to be a dark navy blue color to match our navy and copper dresser, but didn’t necessary care to have them be ombre like the ones at Anthropologie. I liked the ombre style but when I first looked at the photo I didn’t even notice it, the dark blue and romantic/vintage style is what caught my eye. I decided to keep the lace all one color instead, which also made it easier.
First I mixed up some custom navy paint with some fabric medium in an old plastic bin {just make sure to follow the directions on the back}, and then threw the lace runners in there because I was too impatient to test it out. Go big or go home, right? I had never used fabric medium before and purchased it back when I planned to paint a west elm inspired rug, but wound up using a sharpie instead.
martha-stewart-fabric-medium
I’ve gotta admit, that stuff is amazing! It’s water based so that thinned out the paint a bit and I just stirred the lace around in the paint every 5-10 minutes or so for about 40 minutes. I wore gloves and used my hands to stir them around because that easier, but you could just use a paint stick if you wanted. Afterwards I squeezed all the excess paint out and laid them out flat on old towels in the garage to dry. It was 2am and rainy so I couldn’t leave them outside to air dry. The color looked great and I couldn’t wait to see what they would look like the next day!
I didn’t take a photo of this process, but afterwards I had covered the bin with foil so I could possibly use more of the “dye” on other projects. Here is a photo of the paint the next day:
custom-mixed-paint-with-fabric-medium-to-dye-lace-upcycledtreasures
And yes, it did work on other items {which I will share soon} and now I am in <3 p="" process="" this="" with="">
You are supposed to let the fabric dry for 24 hours, but I was impatient and after 12 hours they seemed completely dry to me, so I went ahead and ironed them out. This also heat sets the fabric medium and allows you to be able to wash them later on without losing the color. {I’ll have to jeep you posted on that}. I kept an eye out to make sure the paint didn’t get on the iron, and it was all good. Once I added more water to the iron and turned up the heat it started to get sticky so I just lowered the temperature and let out some of the water.
ironing-painted-lace-runners-for-curtains-upcycledtreasures
Once the runners were dyed, dried and ironed I used a chalk pencil to make a line halfway down and then cut each runner in half.
diy-lace-curtains-marking-lace-table-runners-with-chalk-Anthropologie-knockoff-upcycledtreasures
I’ve gotta admit that I originally planned on just using the glue gun {or liquid stitch} to attach the lace to the panels to save on time and because the last time I used a sewing machine {despite having one in our house} was during Home Ec in high school, a loooong time ago. Ha. My mom nearly had a heart attack when she heard about me using the glue gun though so she convinced me that we should sew them, and she could show me how to use the sewing machine again.
how-to-make-romantic-vintage-lace-curtains-out-of-table-runners-inspired-by-Anthropologie-upcycledtreasures
By the way, I actually did use the glue gun on my pom pom curtains and they turned out great, but because lace is delicate I figured sewing would be a better option, and make them easier to wash later on. {My pom pom curtains are not posted yet but you can see a sneak peak here}.
If you don’t have a sewing machine I would definitely recommend trying out liquid stitch, that stuff is AMAZING! I’ve used it on several placemat pillows and it has held up really well.
It’s funny because learning how to use the sewing machine has been on my never ending to-do list, but I have never been so motivated to actually do it! Guess these curtains really did inspire me. So with my mom’s help and direction we pinned all of the lace down to the sides and then sewed them on.  We also cut off a section where the lace overlapped to get the pattern to look consistent and I later hand sewed that small section together.  I was so excited to see how they were coming along and that the sewing machine isn’t as scary as I thought. Plus I LOVE our new curtains!
upcycled-diy-navy-lace-curtains-upcycledtreasures
DIY-romantic-vintage-lace-curtains-for-master-bedroom-inspired-by-Anthropologie-upcycledtreasures
diy-lace-curtains-close-up-upcycledtreasures
DIY-navy-blue-lace-curtains-Anthropologie-inspired-upcycledtreasures
I know they don’t look exactly like the Anthropologie curtains, but I love the contrast in navy and white and how romantic and vintage they look and feel. They are exactly what I wanted and only cost me $20 out of pocket, whaaaaa?! Not to mention that we were able to use something from our wedding  day which makes then even more special.
What’s funny is the lace runners never made it to the tables during our reception anyway {well aside from one on the sweetheart table}, because the gazebo didn’t get finished in time and we had to improvise. Guess they were never meant to be table runners to begin with :)
So what do you think? Do you like to make your own curtains or buy them?
diy-lace-curtains-from-upcycled-table-runners-upcycledtreasures

DIY Tutorial | STORAGE BINS WITH PIPING

I’ve posted a few tutorials on storage bins, and I plan to keep posting until the clutter is gone! Lol. Not going to happen. What really happens is that I get all wonky and excited about adding trim to something and then it becomes another tutorial.. On this bin, I wanted to add a contrast or subtle pop to the top edge.  Piping was perfect to use!
Main Bin bottom close up copy
Wouldn’t these bins be perfect in your home office? How about the new nursery?
This is a perfect fat quarter project.. You will need 2 fat quarters, so make sure to select FUN prints and colors. Then all you need to do is trim each fat quarter down a little, fold in half and you are almost done.. Really it’s that simple.
Materials:
  1. Fabric in 2 colors – 1/2 yard each
  2. Interfacing for outside – Pellon 809 Decor-Bond 
  3. Interfacing for the lining –
  4. Piping – contrast color
  5. Disappearing fabric ink pen
  6. Sewing materials
  7. Piping Foot
  8. Rotary cutter, cutting mat and ruler
  9. Iron and ironing board
Before we get started you need to do the following:
  1. Cut your bin fabric – cut 2 rectangles measuring 22″ L x 14 1/2″W.
  2. Cut your interfacing – cut 1 rectangle in the same dimensions as above in the SF101 Shape-Flex and another in the 809 Decor-Bond.
  3. Iron the interfacing to the fabric – Iron the 809 Decor-Bond to the outer fabric and iron the SF101 Shape-Flex to the lining.
A couple things to consider:
  • If you are using fat quarters, you might need to trim the ends a bit. If you are making a few bins, this may make them slightly different in size.. As mine ended up being.
  • You need to really fuse the Decor-Bond to your fabric [backside..]. Test a small piece before going full tilt on your main fabric. Also, as you work with the fabric, it tends to gets wrinkly. Just tell yourself that this gives your bins a little more character.

Alright now that we have the boring stuff covered, let’s get sewing:
Step1: Lay the rectangles onto your work surface. Fold one of the rectangles in half, it should measure 11″L x 14 1/2″W Pin. Place into sewing machine and stitch together with a 1/4″ seam allowance. Press seams closed and then open and press again. Repeat for the other rectangle. NOTE – this step is not shown.
Step2: Create your boxed corners –  It breaks down the process into very easy steps. on the 45 degree angle, measure inwards 3″. Mark with a disappearing fabric ink pen. Place into sewing machine and stitch following the line.  Repeat for the other 3 sides.
Step3: Cut the tip off, leaving about 1/4″ –  1/2″/
Step 4: Turn the outside bin to be right side facing in. You will be sewing the piping onto the outside bin top edge.
Step 5: Cut your piping – it should be the circumference around the top edges, plus approx 2″. Start at a side seam and pin in place, over lap the side seam 1″ Note that the raw edges face each other/piping faces into the bin.
Step 6: Pin the piping around the top edge.
Step 7: There are a few ways to finish the ends of the piping. One these bins, I inserted one end of the piping into the other end. It gives it a super clean finish. If that scares you, you can just lay the piping on top of each other, criss cross and have the raw ends run into the seam allowance.
Step 8: Turn the lining bin to be right side facing in and the outside to be right side facing out. Place the lining into the outside bin. Pin along the top edge. Place into your sewing machine and stitch together. Remember to leave a 3″ – 4″ opening. Press.
Step 9: Pull the bins right side out through the opening. Press.
Step 10: Turn under the opening seam allowance. Press. Pin. Place into your sewing machine and topstitch around the outside edge.
Want to know what fabric I used? Check out Art Gallery Fabrics – the collection is called Arizona from April Rhodes – the mustard yellow print is called “Canyon Wall” and the mint is called “Triangle Tokens”.
This post was brought to you in collaboration with The Fat Quarter Shop. They provided me with the fabric to create this post. I appreciate the support that allows me to create new and unique content for my blog. That’s it for today. Happy Sewing

DIY Tutorial | Sew a Teepee Play Tent

My Little A loves to read already and she’s only just turned two years old! Her reading, mind you, is staring at picture books lovingly but I’m thrilled that she’s showing such a love for books at this age. I’m trying to finish her little room before Baby Three comes, and I thought making a cute tent in her room for her to retreat with some books to would be fun. I’ve seen so many creative DIY play teepees and tents online, and I thought I’d create my own for my little girl. I did, and I’m so excited with how it turned out! She absolutely loves it, and it’s such an adorable addition to her room decor.
DIY Teepee Play Tent Tutorial by The DIY Mommy
This is a toddler-sized teepee (about 36″ x 36″ and 5′ tall), so if you follow my instructions you should come out with something with about the same dimensions! If you want to make a larger teepee, buy longer dowels and calculate your own measurements for the fabric (I’ll explain how I found mine out).
DIY Teepee Play Tent Tutorial by The DIY Mommy
This tutorial does require sewing, but it’ simply a lot of straight lines with a regular ol’ sewing machine and/or serger. If you don’t like to or cannot sew, I recommend checking out this no-sew teepee tutorial. The fabric is wrapped around the frame rather than sewed together.
DIY Teepee Play Tent Tutorial by The DIY Mommy
I chose to make this tent with 4 dowels (for simplicity and budget sake), but I’ve also seen them made with 5 or more. If you’d like to use more, you’ll also have to calculate your own measurements for the narrowed side panels. I really like our simple, four-sided tent, however!
Here’s how to make your own:
Materials:
  • 4 lightweight wooden dowels that measure 6′ tall and 3/4″ in diameter or less *For those that have asked, I found my dowels at Home Depot in the moulding section. They are 3/4″ full rounds made from Hemlock that were 12′ long that I cut down to size.*
  • a painter’s cotton canvas drop cloth (I used a 9′ x 12′ drop cloth and have plenty left over for other projects)
  • 1 1/2 yards of printed cotton fabric (for the curtain doors, tie backs and embellishments)
  • 4 yards of decorative trim (optional) (I used pom-pom trim leftover from this project)
Directions:
If you’re making a tent that’s the same size as mine, follow the cutting guide below. If not, set up your 4 longer dowels by tying them together at the top (about 9-12″ from the top), spreading out the bases evenly to the height you want, and measuring the width and height of the triangles you’ll need.
DIY Teepee Play Tent Tutorial by The DIY Mommy
For a toddler teepee like mine, cut out three triangles from the drop cloth, one smaller triangle for the front panel from the drop cloth, and the two large and two small rectangles from the printed cotton fabric. Use the guide below for your measurements and make sure that the bottom of each piece is on a hemmed edge of the drop cloth. This saves you having to hem yourself!
DIY Teepee Play Tent Tutorial by The DIY Mommy
The cutting is my least favourite part because of the bulk of the fabric and size of the pieces, so I cleared out a large space on the floor in Little A’s room to do it! I used a measuring tape, a hard edged ruler and a pencil to measure my pieces and ensure I had straight lines.
DIY Teepee Play Tent Tutorial by The DIY Mommy
Once the pieces are all cut out, it’s time to get started on the front panel with the curtain doors.
DIY Teepee Play Tent Tutorial by The DIY Mommy
Hem the bottom and the two inside edges of the large rectangular curtain pieces (fold over 1/4″, then another 1/4″ and stitch). You can then embellish the inside and bottom edges with trim if you wish.
DIY Teepee Play Tent Tutorial by The DIY Mommy
Lay the bottom diagonal edge of one of the drop cloth triangles over one of the curtains and cut the side of the curtain diagonally to match the side angle of the drop cloth triangle. Repeat with the other curtain piece.
DIY Teepee Play Tent Tutorial by The DIY Mommy
Next, find your small drop cloth triangle and pin your two curtain pieces to it so that their top edge is about 1/2″ above and behind the small drop cloth triangle. Adjust the curtains to overlap and match the sides of the drop cloth triangle. Pin and then stitch together.
DIY Teepee Play Tent Tutorial by The DIY Mommy
Fold each of the two tieback rectangular pieces in half horizontally (right sides together), and sew down one short side and the long side. Turn them right-side-out and press to form a strap piece. Pin one tie back to the raw edge of one side of the curtain. I pinned mine so it was about half way down the curtain piece. Repeat with the second tie back and curtain.
Sew a small piece of velcro (hook side) onto each tie back, and another small piece (loop side) onto the wrong side of the curtain that’s about 2″ from the seam and in the same spot vertically as the tie back.
DIY Teepee Play Tent Tutorial by The DIY Mommy
You can embellish the top half of the front with an applique if you like. I chose to cut a circle out of my printed cotton (using a dinner plate as my pattern), and then I later crocheted a sweet pink heart and hand stitched it to the center. I’ve also seen some adorable tents and teepees with children’s monograms on them! You could also sew a bunting banner and stitch it to the top of the front.
DIY Teepee Play Tent Tutorial by The DIY Mommy
Now, you’ll simply be sewing all of the triangular panels together to make the pyramid shaped tent. Each seam will be a casing for the dowels.
Sew each panel together at the sides of the triangles, lining up the tops and bottoms (and pinning if you wish) on the RIGHT SIDE of the fabrics using a 1/2 seam allowance. You will have 4 panels sewn together and four seams. I found the drop cloth frayed a TON, so make sure you catch both sides of the drop cloth well when you sew them together.
At this point, you can serge, zig-zag or hem the very top of the teepee. I chose to leave mine with raw edges and so far it’s holding up!
DIY Teepee Play Tent Tutorial by The DIY Mommy
Then, turn the tent inside out and fold each corner right-sides together. Stitch a line that’s about 1 1/2″ from the seamed edge to create a casing for your dowels. Repeat from the top to the bottom of each of the 4 seams.
The inside of the tent and the casing will look nice and neat, like this:
DIY Teepee Play Tent Tutorial by The DIY Mommy
Now, all you have to do is insert the dowels and tie the tops! Insert each dowel, one at a time, through each of the four casings. I found it easiest to go from the bottom of the teepee to the top. Once they’re all inserted, stand the teepee on it’s bottom, arrange the dowels at the top, and tie them with a piece of twine or rope. There will be about 9-12″ of dowel sticking out of the top of the teepee.
DIY Teepee Play Tent Tutorial by The DIY Mommy
You’re all done. Wasn’t that fun? I absolutely love how this project turned out. It adds just the right amount of whimsy to Little A’s bedroom.
Teepee-Reading-Play-Tent-by-The-DIY-Mommy-2
We’re SO CLOSE to finishing her room! There are just a few things left to do.
DIY Teepee Play Tent Tutorial by The DIY Mommy