Monday, August 31, 2015

DIY Tutorial | How to Prevent Thread Tangles in Hand Sewing


No matter what kind of sewing you like to do, there are times you must use a hand needle and thread. It could be for something simple, such as sewing on a button, stitching an opening closed, or tacking a strap in place. Or, you can move up the hand-sewing food chain to beautifully intricate techniques, like hand embroidery or hand quilting. Learn our favorite tips to help eliminate knots and tangles, and keep those stitches flowing smoothly.
Whether you’re a pro or a novice at hand sewing, you’ve probably noticed how easily thread can twist back onto itself and become knotted, tangled or both. When this happens, after the cursing subsides, it becomes almost impossible to effectively finish your stitching. In some instances, you may have to completely start over because the thread breaks in the middle of your work as a result of your attempts to remove the knot!
We’ve outlined our favorite products to use and the tips to try to tame those tangles.

Fave products

Beeswax

A commonly used product you may have spied in your mother's or grandmother’s sewing box is beeswax. It’s traditionally found in the shape of a circle, often in a circular plastic case with notches on it so you can easily pull the thread through the beeswax before sewing (which you should do two to three times to properly coat the thread with wax).  
The beeswax coating provides added strength, resistance to static cling, and helps allow the thread to slip through the fabric and prevent tangling. In addition, you can wrap your beeswax-ed thread in a scrap of fabric (preferably muslin), a paper towel, or just plain paper and then iron the thread. This ironing process will melt the beeswax onto the thread for additional strengthening. The one negative to beeswax is that it can stain your fabric. And, some people find it too sticky. As we always say, test first!
You can find beeswax at most local sewing supply stores. We found it online at Amazon as well as other retailers.
You can also find blocks of pure or natural beeswax,"which some experts say is the only way to go. We found a nice selection of this natural beeswax at Laney Honey.

Thread Heaven

A popular alternative to beeswax with many sewing experts is Thread Heaven. This is a thread conditioner and protectant that comes in a little blue box with a hard gel-like square inside, into which you press the thread as you pull it through. It provides all of the same benefits as beeswax, such as strengthening, anti-static, and tangle reduction. 
Thread Heaven treats the thread so it doesn't discolor, and the product does not stain after laundering or ironing. It protects against UV rays, resists mold and mildew, reduces thread drag, and has a whole host of other benefits you can read about on the Thread Heaven website. Their site also has step-by-step instructions on how to properly apply it... even though it's really pretty straight forward.  
Those who use this product rave about its benefits and ability to keep thread from tangling. You can even use a tiny dab on the eye of your machine needle to help reduce static as the thread passes through the eye of the needle.  

Home remedy

At Sew4Home, we understand everyone has a budget. So, when we’re researching a subject, we like to also look for ways to use household items you may already have on hand. We learned many quilters use dryer sheets to help prevent static cling and tangling when sewing by hand. Simply run your thread between the layers of a folded dryer sheet a couple times to try this trick. Here again, we strongly recommend trying all the various options we’ve discussed to see which works best for you, your specific project, and your thread type. 

Hand sewing thread versus regular thread

Many thread companies make specific thread for hand sewing, which is already treated or coated to help reduce static, tangles and knotting. You can check out these options at a local sewing supply retailer and compare how they feel in comparison to the regular threads you use in your machine. 
NOTE: Do NOT use hand sewing thread in your sewing machine. It's okay to use machine thread for hand sewing, but don't do the other direction as hand sewing thread may not have the tensile strength to work in a machine.
When it comes to thread, you can dive right into the deep end and soak up tons of information about types, twists, finishes, and more. There's a lot to know about this sewing staple! You'll soon learn certain types of threads are more susceptible to static and tangling. The Superior Threads website has an extensive Education section that will increase your thread knowledge exponentially (and possible increase your chances of appearing on Jeopardy!). We also have a Sew4Home article overview on selecting the right thread for the job; it was put together with help from our friends at Coats & Clark. 

Other hand sewing tips

Always thread the end you've actually cut from the spool into the eye of the needle. 
As you hand sew, pull the thread in the direction you are sewing. 
Hand quilters will roll the needle between their fingers as they stitch in the opposite direction of the twist of the thread.
Cut you thread into lengths no longer than about 18" to 20". Some people have offered a non-tangle tip of not cutting your length of thread from the spool until after the eye is threaded. 

Credit to: sew4home.com

DIY Tutorial Tie Dye Denim


Whether it be shibori or with bleach, warm weather brings out our utmost desire for tie dying – especially when it comes to bleaching as working outdoors for this project is a necessity. Inspired by Isabel Marant‘s tie dyed sweatshirts, shirts and jeans, we grabbed our favorite denim shirt and a bottle of Clorox for one of our favorite summertime projects.

You’ll need:

  • a denim shirt
  • bleach
  • rubber bands
  • rubber gloves
  • plastic container
If the shirt hasn’t already been pre-washed, run it through the washing machine first. Start binding the sleeves first. There is no right or wrong way to do this but try to keep it somewhat in an accordion-like fold so the exposed areas stay consistent.
After the sleeves are tied, crumple the body of the shirt. Bundle and reinforce with extra rubber bands.
Pour 3 quarts of bleach and 3 quarts of water into a plastic container. Using rubber or plastic gloves, place the shirt into the bleach mixture.
Let the shirt sit for approximately 15-20 minutes. If the shirt isn’t completely submerged, give it about 15 minutes on each side. Watch it carefully after the first 15 minutes – as soon as the color starts to lighten, remove it from the bleach. Snip off the rubber bands and rinse thoroughly with water.
Throw it in the dyer and your denim tie dye shirt is ready to wear!
credit to: honestlywtf

DIY Tutorial Elbow Patch


DIY Elbow Patch


You’ll need:

  • a wool sweater
  • a 36 gauge felting needle
  • a piece of dense foam cut to size or needle mat
  • some wool roving
  • a 3″ heart cookie cutter
  • an iron
With the sweater on, place a piece of tape about half an inch below the elbow. Do the same with the opposite elbow. Remove the sweater and insert the foam block into one of the sleeves.
Align and center the bottom of the cookie cutter along the top of the tape. Pinch off a few tufts of wool roving.
Fill the cutter, spreading out the wool fibers evenly.
At the base of all felting needles are tiny, sharp burrs, which grab and interlock the wool fibers. While holding the needle verticallyrepeatedly stab it into the wool roving and through the sweater. I found it easier to work around the outer perimeter of the cutter first and then work my way inwards. Important tip: To prevent breaking the needle, always keep the needle upright and never at an angle. And don’t forget to pay careful attention to your fingers while felting as the needle is extremely sharp. Honestly.
Continue stabbing away until the surface is flat and even. Fun, right?!
Remove the cutter and use the tip of the needle to reign in any stray fibers, if necessary. Don’t worry about the holes as they will be mended later.
Patch up any bare or uneven spots by adding more wool roving where needed.
Carefully peel the sweater away from the foam. Notice that the fibers have transferred through to the backside of the sweater.
To smooth and set the patch, spritz with water and press with an iron on the wool setting.
Repeat the same steps the other sleeve.
Ta da! Your heart shaped elbow patches are finished!

Credit to:honestlywtf.com

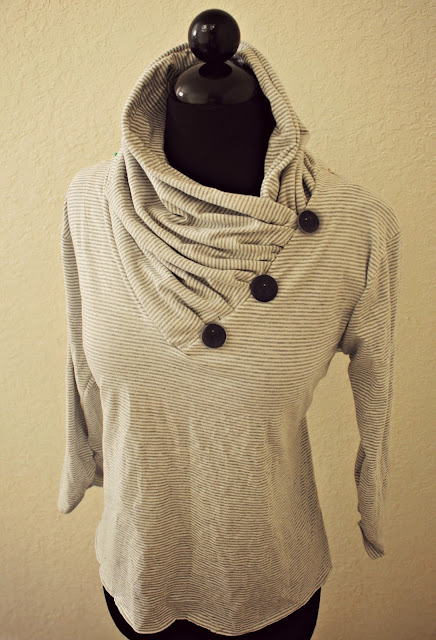
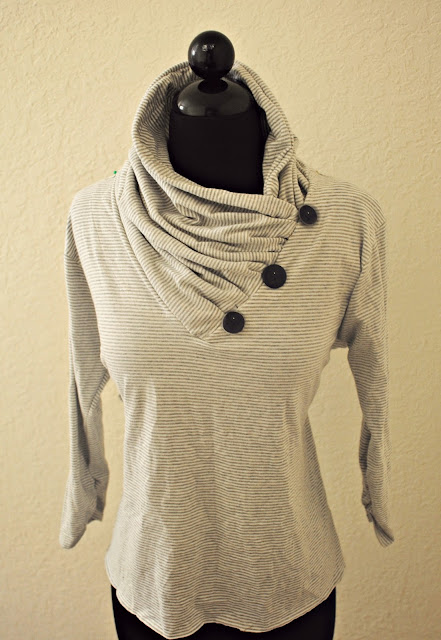
DIY Tutorial V-neck into Gathered Cowl Collar

V-neck into Gathered Cowl Collar


This is an easy DIY to turn a plain v-neck into an interesting cowl collar.
You can use a scarf, fabric, anything that will fit around the neckline. 


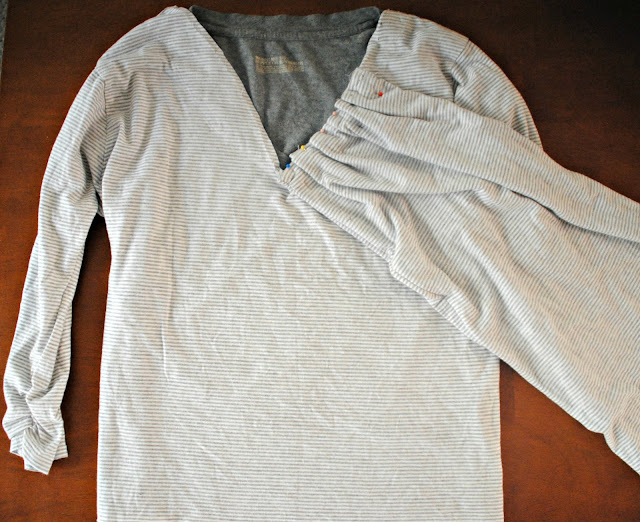
Before: Mine was a crew neck so I made it a vneck by cutting a v...

DIY:


I made a tube by folding a rectangle of fabric that measured 36 by 30 inches. I folded it in half long ways and sewed right sides together, then flipped it out. That way it had a heavier texture and the edges didn't need to be finished.  If your using a scarf, fabric, or making a deep v-neck you will need to measure it accordingly.


Gather folds with one end of the neck panel starting at the point of the vneck. Leave about 3 inches from the shoulder for the panel to wrap around.  Sew right sides together. 


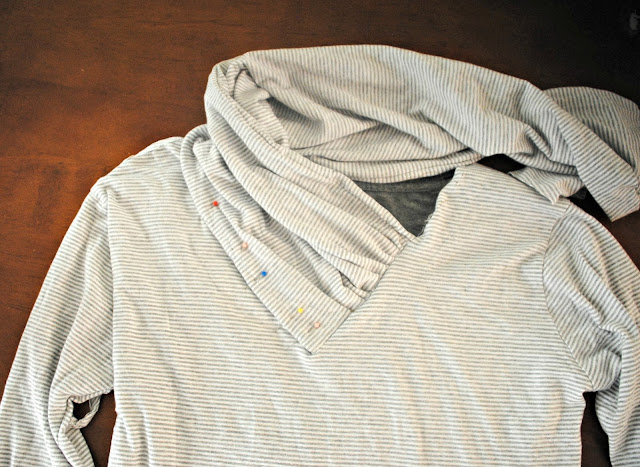
Pin the rest of the neck piece along the vneck and back...Top stitch around or sew right sides together. 


Gather the rest on the collar overlapping with the front gathers. Sew right sides together...Trim any excess.

Add buttons...or not. 
Credit to: trashtocouture.com

DIY Tutorial Embellished Sweater

DIY Embellished Sweater


I decided I wasn't making a New Year's project but since the day was so relaxing I made a last minute sweater. Took me a good 5 minutes and was one of my favorites thus far. 


 I was saving this appliqué for something special and turned out lovely for our low key New Year's evening. 


Before: husband's old sweater


Added the appliqué by hand sewing around the outside edges and then cut the remainder on the inside.  
You could hot glue it as well since it was hard to sew around the beading. Really it was that simple, but finding the embellishment will be the hard part. 

Sewing Tips: French Seams (a clean finish for your raw edges)

 French Seams (a clean finish for your raw edges) 


I haven’t done this in a while but it’s time to answer another sewing ‘Frequently Asked Question’.  And that is, “how in the world do I make one of those fancy French Seams??”  Some of you may already know how to do this, some may have forgotten how (and this is a good refresher), while others have no idea this sewing technique exists!

You know, there is a difference between rushing through a project and cutting corners, and then taking your time to make everything look nice, inside and out.  I admit, I’m usually, the rushing/cutting corners type-of-person.  I like to make things, but don’t always have enough time to spend lots of time making everything perfect.  However, on certain occasions, I really like to make things really pretty, inside and out.  I tend to take more care when I’m using expensive fabric, making a gift for someone else, or if I’m making a keepsake for my own children (blessing/baptism outfit, quilts, etc.)  And then I try and use a more finished seam, like the French Seam.

HOWEVER, when sewing with really sheer fabric (and fabrics that fray a TON), this seam is ideal.  It hides raw edges completely, it keeps all the fraying enclosed, and it will save you from some frustration while sewing things like sheer drapes, a sheer overlay to a dress, etc.

So, tuck this technique away, and use it when you’d like to really make something super polished………or when it’s NEEDED.

IMG_9875-003


Now, think for a second…….about those sometimes raggedy edges of your inside seam allowances.  Especially, wash after wash after wash. 

Now, imagine them all completely closed up and not a single stray thread in sight, inside and out.
 french seams


It really is a pretty little edge.  It can’t be used on curves……but it looks gorgeous on all those straight seams.

French Seams……..oh, how you make my sewing looking amazingly professional! :)
 IMG_9822


 Ready for the good news??  It’s pretty stinkin’ simple.  

Let me show you…


First of all. line up your two edges that you want to sew together using the French Seam……but place the edges together with WRONG sides together.  I know, weird.  But you’ll see why in a moment.

Now, determine your seam allowance.  A common seam allowance is 5/8 of an inch.  So, if that’s the allowance given for your project, keep that in mind.  You will be sewing two different seams to create your French Seam, so split that allowance into two, 2/8 of an inch and 3/8 of an inch.  You want one of the seam allowances to be smaller and will use that seam allowance first.  ALWAYS.

Sew the two layers together, using the 2/8 (or 1/4) inch seam allowance.
 IMG_9742


Then, open up your fabric to the “wrong” side of the fabric, and iron flat.
 IMG_9750


Then, fold the fabric together with the “right” sides together.  Fold the fabric right along the seam you just made.
 IMG_9753


And then iron flat.
 IMG_9765


Now, with the “right” sides together, sew your 2nd seam allowance of 3/8 of an inch.  What just happened, is that you are now enclosing the raw edges of the first seam (shown as the black dotted line), inside of this new seam.  And this is why the first seam allowance needed to be smaller than the first…..so that it would fit inside of this second seam and not poke out.  Otherwise, this whole technique is useless.  (TIP: If you are using different seam allowances than the ones shown here, you can always cut down the extra fabric from your first seam, so that it will fit into the second seam.)
IMG_9792


Now, open up your fabric to the “right” side, and iron the fabric open.
IMG_9797


And that’s it.

A pretty little French Seam.
IMG_9815


Happy Sewing!

Credit to: makeit-loveit