Showing posts with label
#alborj #sewing #machine #needle #thread #stitching #fashion #newlook #Tips #tricks.
Show all posts
Showing posts with label
#alborj #sewing #machine #needle #thread #stitching #fashion #newlook #Tips #tricks.
Show all posts
 Denim is a very popular fabric these days and is synonymous with jeans. Today term “jeans” usually refers to a specific style of pants, called Blue Jeans. These“rivet-reinforced” denim pants were invented by Jacob W. Davis, along with Levi Strauss & Co., in 1871. We did a post a few months about highlighting this story of Levi Strauss, who perhaps more than any other individual or institution has done more to expand the role of denim in our society.
Origins of Denim
However, given this important American contribution to the success of denim, what most people don’t know today is that denim was actually invented in France. In fact, the word “denim” comes from the French “de” which means from and “Nîmes” which is a wonderful town in the south of France where denim was invented during the Middle Ages. So denim literally means “from Nîmes”. Originally called, “serge de Nîmes”, the name eventually shortened to denim in 1864.
Nîmes is an ancient Roman city most famous for its colosseum and aqueduct known as the Pont de Gard which stands over 160 feet high over the Gardon River and was build in the first century AD as part of a 50km system to carry water to the prosperous Roman colony of Nemausus, today know as Nîmes.
The contemporary use of the word “jeans” actually comes from the French word for Genoa, Italy (Gênes) as sailors from this town were known to wear these cotton trousers. Jeans are also often referred to as dungarees which means coarse fabric and is one of the very few words from Hindi, one of the major languages from India, to make it into the English language. Cotton fabric dating back over 5,000 years has been found by archeologists in what is today West Pakistan and India.
The world’s beloved “jeans” have been around for a very long time!
Characteristics of denim
Denim is a very strong, long-lasting fabric that has been extremely popular for over 100 years. Anyone who has owned a pair of jeans knows you must not skip your pre-wash. In many cases, they will shrink a little bit but also pre-washing will soften the fabric somewhat – the more you wash the softer they will become. It’s always advisable to wash new denims alone, otherwise there’s a good chance some color will run off and transfer on to other clothes.
 Denim is also one of the longest lasting fabrics on the market. Jean owners know their jeans have been with them for a very long time! The irony – just when you get them exactly where you want them, they start falling apart!
If you need to tailor your denim or have a tear, you must arm yourself with high quality thread and very sharp, strong needles. Average thread and needles will not work with this tough fabric. If you are sewing your own jeans from scrap, make sure you have the proper tools for the job:
Tools & Sewing Suggestions:
Use sharp tools. This includes both using sharp professional-grade sewing scissors as well as sharp rotary cutters.
Use heavy duty needles, either ones made specifically for sewing denim like these Schmetz Denim Needles, or a universal needle that is at least size 90/14. If the denim is particularly thick, make it 100/16. These needles will have a reinforced blade to minimize needle deflection and reduce the risk of broken needles or skipped stitches.
Use heavy duty Jeans Thread, particularly for the topstitching associated with flat felling or if you can’t find this, you might also try upholstery thread.

Denin Sewing Methods & Seams:
Again, you must have sharp tools. A very sharp pair of scissors or sharp blades in your rotary cutter will make cutting patterns much easier. Depending on the thickness of the denim, you might have to cut through the denim in layers, one layer at a time. If this is needed, make sure your flip your pattern pieces as you go along. It’s also suggested that you purchase really strong pins, average pins will more than likely bend, unable to penetrate the fabric.
Denim is not the easiest material to work with, you might want to take small pieces and practice cutting; using a seam ripper and running a stitch test to determine how it looks, if the tension is correct and the best length for the stitch. You may want to use a longer stitch than normal which should be between 3 and 4.
Pay attention to your seams, there’s a knack to creating seams which will save you a great deal of time. Have your iron nearby and press the seam as flat as possible. Try and cut back on bulk, as much as you can, by trimming the seam as you sew and miter any corners.
Take your time sewing, hold the fabric as firmly as you can while feeding through the machine, do not push or pull. If your sewing machine is having difficulties with a particularly bulky seam, you might want to use the hand wheel. It’s pretty easy to break a needle when sewing denim, so be careful.
 Even though your standard presser foot should be just fine, you might want to consider purchasing a Jeans Presser Foot if one is available for your sewing machine like this one for a Bernina. It will make your sewing a great deal easier. Also, consider using a walking foot which should keep the fabric from shifting around. Depending on the year and make of your sewing machine, a jeans presser foot might or might not be available. The older your machine, the less likely you will be able to find one. Also consider an edge stitching foot for top stitching, it will be well worth it.
Denim is one of those materials that can easily fray which is why it’s important to have sharp tools. Note: If you go for a zig-zag stitch over the cut edge, on the interior seams, it will keep the material from fraying.
credit: so-sew-easy.com

I get asked a lot for suggestions from people who are just learning to sew or who are picking it back up again after a few years. I do my best to share some of my tips with them, most of them were learned the hard way and I'm always happy to do anything I can do to help prevent a little frustration.
I sat down and made a list of some of my most used (and I hope helpful) sewing tips and tricks, read through them and let me know what you think!
Tip #1 Don't be Afraid to Ask for Help
Most everyone who is sewing now had some help at the beginning of their sewing career. Maybe you have a friend who is an excellent seamstress, or a Grandmother who would love to share some of her knowledge with you, odds are that you know someone who can help you learn.
Asking something like, “I started sewing this purse and got a pretty good start but now I’m at a point that I am stuck and was wondering if you could help me out a bit?” should get a great response from most experienced seamstresses.
If you want to learn at some point there will be some “trial & error” and the only way to get past it is just to try, you are capable of doing a lot more than you think you are!! Give it a shot on your own then when you get stuck, turn to your friend to get some help.
Tip #2: Take a Class
Even though I learned to sew as a teenager I still took sewing classes as an adult. The teachers always helped me to look at things in new ways. I learned techniques that I never would have figured out on my own, plus there is the added bonus that you FINISH the project during the class, so it doesn’t get thrown in the “someday” pile.
Most cities have either heirloom sewing or quilting stores that offer classes, talk a friend into going with you and be BRAVE and just sign up!
Tip #3: IRON!
It may seem like a pain to get up from your sewing machine and go over to your ironing board to iron each seam you sew, but you MUST do it! There is no better tip that I can give you than to IRON! I can always tell a project that was poorly pressed along the way. Invest in a good quality iron, next to your sewing machine this will be the most valuable tool in your sewing arsenal!

Tip #4: Change your Needle
Once in a class I took the instructor informed us that we should change our needle every-time we start a new project. I don’t change mine that often but try to change it every few projects. A dull needle will cause your machine to skip stitches, pull fabric or cause problems with your tension. So ask yourself “when was the last time you changed your needle?”… Probably been a while…

Bulk Package of Sewing Machine Needles (check to see which exact type your machine requires before ordering)
Tip #5: Use your Seam Ripper
I know no one ever likes to unpick something they have just sewn… but just do it. If it’s not right, you will expend more energy trying to fix it later than just unpicking it in the first place.

Tip #6: Re-thread Your Machine
Just think of it like rebooting your computer, one little thing can fix a multitude of ills. If you break a needle, break your thread, or your machine starts sewing funny, rethread it. Trust me it works :)
Tip #7: Walk Away
If you get to the point in a project where you are sewing sloppily or find yourself saying “good enough” more than a few times… walk away… Put it down and go do something else. This is the thing that took me the longest to figure out. I can not tell you how many times I have woken up in the morning and had a “uggggg” moment because I stayed up too late working on something that I was really not in the “mood” to be working on.
If you get frustrated with a project or lose interest, it’s OKAY to leave it for a bit. Nine times out of ten you will get your “mojo” back soon and be able to finish it up. There is nothing worse that working while your frustrated! So don’t do it!!
credit: ebay.com
Like with any great craft, comes the need for organization. And Lord knows, when you sew, you've got your fabric, your thread, your needles, and of course, your bobbins. I thought those notches in the spool ends or grips at the end of one spool end (like the Guterman's brand) were ingenious! It keeps the loose strand of thread from unraveling off the spool and tangling with everything else.
But why, oh why, couldn't they have thought of something similar for the bobbins?
For years on end, my bobbin storage looked like this:


How did I collect so many bobbins?
A nasty, stringy mess of thread and metal. It looks even worse when I'm working on a project.
For the life of me, I could not think of how to tame this beast! I didn't want to blow money on another plastic case. They were already in a plastic case.
Until I came across this idea on Pinterest. Use those pedicure toe separators.
You know, those foam thingies you use to separate your toesies when you're giving yourself a pedicure. I admit, I don't usually have those things in my house. Which would eventually reveal that I don't normally give myself a pedicure...but I digress.
I happened to come across a whole bunch of fabulously colored ones at Michael's yesterday.

Lime green and watermelon, please.
And hells to the yes, I picked them up! They came with nail files and cost about $1.00 each. Can't go wrong with that. Recycle the clear plastic packaging; use the nail files. Can't go wrong.
So, to battle I went with the messy bobbins.

You shall not defeat me!
They fit perfectly in the separators - both the metal bobbins and the plastic ones!

Down with you, nasty loose thread! Just turned it counterclockwise and it was tamed. And the loose thread? Just rotate the bobbins until the ends are neatly tucked in.
EHRMAGERD.
 Look at that. Doesn't that look sweet??!!! And here they are in my sewing box.


Quilting and Binding
Welcome everyone to the Quick as a Fox Quilt Along! If you are just finding this for the first time, you can find all the previous blocks here and the photo gallery here.

Today we will be finishing up the quilt along. It has been so fun to see your quilt blocks and progress of the quilt! I am doubly impressed with those who are learning to step out just a little bit and explore, making their own templates for the fox block. Finding your own voice in the quilting world is an adventure! Glad I could be around to see you stretch yourself and grow. Small sewing steps….one at a time is how it happens.
We will be going over quilting your quilt, and making a quilt ‘sandwich’ today. I am not going to go into too much detail, just an overview on the process. There are some super fantastic tutorials out there that show step by step. If I did that here, we would seriously be here all night long and you would lose interest.
Let’s start with the sandwich since this needs to be all done before we can do the quilting. A sandwich is just a term used to describe putting the batting in between the quilt top and backing. The backing is typically 4″ larger on all sides than the quilt top. Your machine quilter will thank you for this. Promise. 4″ larger means….2″ on each side. This allows for a little bit of movement of the quilt top. That does happen when quilting.
Between the top and back is where your batting lives. Now, batting is really up to you as to what kind to use. A lot of quilters like to use the cotton batting. This crinkles and shrinks up when washed leaving the quilt looking more vintage. If you are wanting a more ‘puffy’ look, use a poly batting –one with large loft. I have even used wool blankets for my batting. These are super heavy and super warm. Perfect for beds and winter. Take a look around and see what others are using. Ask questions, take notes. Find out what your favorite blend and loft is. Your choice might also be determined by the use- is it for snuggling? warmth? a wall hanging? You don’t want to put something super heavy if it is hanging from the wall.
Now that we have our favorite batting ready to go let’s make ourselves a sandwich.
You will want to layer your quilt top, batting and backing together. With this size of quilt, if you can find a place to lay the backing down {wrong sides up} on a wood or laminate floor this will help.
Lay the backing out and tape the edges down. This will keep the back nice and stretched and prevent puckering when quilting. Lay the batting on top and then the quilt top on the very top- right sides facing up.
Pin like a crazy pinner! Use safety pins, and pin every 4-5″ or so. This will keep all three layers together while you are quilting. It will also ward off puckering on the backside.
To prepare your sewing machine you will need to drop the feed dogs {mine do not, so i just set the stitch length to 0} and use a walking or quilting foot.
Let’s talk quilting designs real quick, shall we?
When you quilt you will want to start in the center and quilt out from there. This will allow the fabric to move to the outside of the quilt. If you start on the outside edge and quilt to the center you will end up getting bunches or puckers. No good.
There are some easy quilting patterns out there– an all over pattern or meandor. This is a puzzle shaped quilting. You typically don’t cross the lines. This is the ideal quilting design for beginners. It is very forgiving. Easy to learn. You don’t have to worry about what to quilt in each different block, you just quilt. If your fabric is a little bunchy in places, the quilting will hide this. {try really hard to not get bunches though}
I have done this pattern on soooo many quilts I can’t count them all! It is a great way to get your feet wet when starting out with quilting. When you are quilting the 3-d Quilt block you can decide if you want those little pockets to be tacked down or miss them all together, so the 3-d stands out.

For a modern look you can go with straight lines. They aren’t as forgiving as a meandor though, so you have to be careful when quilting this.
The next best quilt design is the loops. It’s sort of a meandor, but crosses over with loops. You can make the loops different sizes, large and small. You can also do a second loop inside the first loop to mix it up a bit.

When quilting you want to watch your stitches!!! This is very important. You don’t want to have toe catchers as I call them. That is a 2″ stitch that your toe will catch when snuggling up with your quilt. If you move your quilt faster than the sewing machine is stitching, you will get toe catchers. This means…..slow down the movement! The idea is to keep all your stitches the same length. Overall it looks better.
Quilting when you have a large space of time is ideal. Having time allows you to get the hang of the design and movement of the quilting technique. Your arms will memorize the movement and the proper speed making quilting fun.
You can see that I did a variety of quilting for the Quick as a Fox quilt. In the block I did the simple meandor- skipping the dresden place ends, the 3-d parts. I kept mostly to the background of the blocks. Inside I did a mix of straight lines, quilting 1/4 from the seam, or outlining the applique pieces. In the first border, I did a loop and the outside border I did a skinny tall loop with a short loop in between mix.
 credit: thesewingloftblog.com
Sewing weights are an easy way to make quick work of pattern cutting. This easy pattern is a great way to clean out your scrap basket.

Keepin’ It Super Simple!
Put those pins away and try these sewing weights when making your next project!

This project is for all levels.
Skill Level- 1 Button

Materials:
fabric
black eyed peas
metal washers (yes, go raid the hardware store!)
Any shape will work for this project. But since it is Valentine’s Day, click here are some fun hearts.
Basic Instructions:
Cut two large hearts from fabric. For interest, I added a smaller heart applique to the center. Click here for the fabric applique tutorial.
Once applique is applied to heart, I added a decorative blanket stitch all around for interest. Any type of stitching is fine here, even zig zag.
Align front and back together with right sides facing each other, pin in place. Remember that these pieces are small and tend to shift in sewing if not pinned together. Using 1/4″ seam allowance, start just above the point on a straight section, single needle top stitch. Stitch all around leaving about 1 1/4″ opening. *Be sure to back stitch at start and stop.
Clip point and all around curved areas. Turn hearts right side out and press. A word to the wise here, pressing is important! Very important. Not only does it “lock” your stitches in place but if you press your seam allowance under in the “open” area, your hand stitching will be much easier.
To fill the hearts, make a paper cone from the bottom scrap of paper heart pattern. Insert into opening and fill with peas. I tend to overfill, I like the hearts to be fat. Be sure to slip in a few washers for added weight.
Slip stitch the open section closed and you are all set!

credit: thesewingloftblog.com
Flower Pin Cushion
I’d like to thank Heather for asking me to participate in sharing one of my favorite sewing tools! Something that I use all the time while sewing is a pincushion. Today I’m sharing with you how to make your own Flower Power Pincushion. This one is designed after the vintage felt embroidery kits that I’ve enjoyed making over the years. You can hand cut all the pieces out of wool felt, but I also have some kits in my etsy shop that I’ve put together that include all the pre-cut wool felt shapes and supplies (including felt, needles, threads and beads) that you’ll need to make a pin cushion! Let’s get started:

Here are the supplies that you’ll need to gather:
2 – 5.5″ x 8″ pieces of wool felt for background
5 green wool felt leaves that measure about 1.5″ x .75″
1 wool felt flower that measures 1.75″ in diameter
3 star wool felt flowers that measure 1.5″ in diameter
5 wool felt circles that measure .5″ in diameter
perle cotton (size 8) in various colors for stitching leaves and flowers
2 strands of embroidery floss for stitching seed beads
seed beads
a crewel needle and a beading needle
stuffing
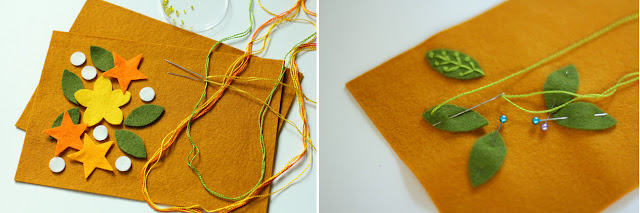
Use the flower shapes and leaves that you’ve cut out of wool felt and place them to the left side on one piece of background fabric (as pictured). I started with embroidering the leaves and pinned each of them in place so that they would stay put while working on a leaf. Embroider the vein pattern in each leaf with perle cotton and the crewel needle. Add a french knots to the end of each vein.
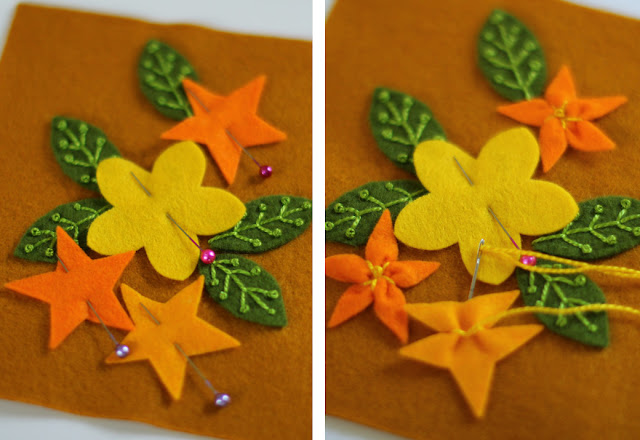
Next, I pinned the large center flower and star flowers in place. Attach each flower by coming up through the center of motif and crimping each petal by bringing yarn around the motif and stitching through the background close to the center. Repeat the step to crimp each petal of the flower and give it a 3-dimensional look. Embroider one french knot in the center of each star flower and three french knots in the center of the large flower.
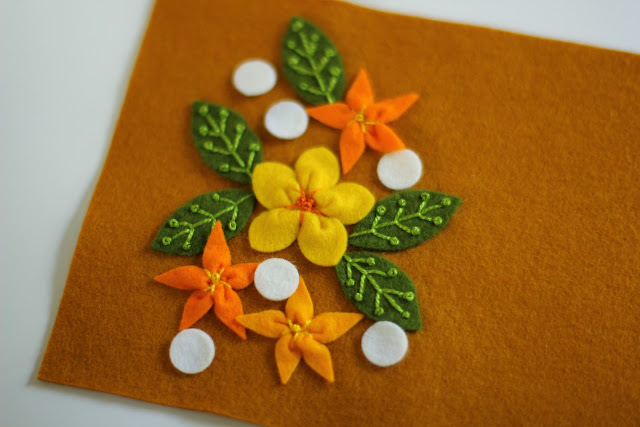
Now, add in the small circle flowers and stitch them on as you did the larger flowers, dividing each circle into four petals.
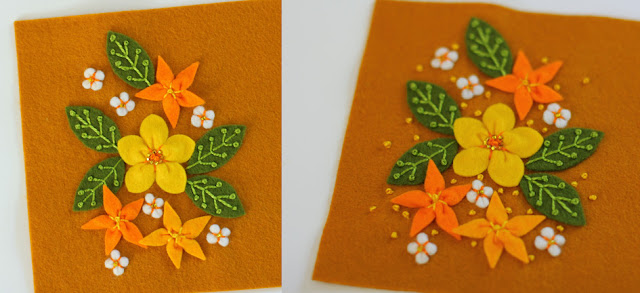
Now, it’s time to add the seed beads. Using the beading needle and two strands of embroidery floss, stitch one seed bead to the center of each circle flower and about 8 beads around the three french knots of the large center flower. Use perle cotton and the crewel needle to embroider french knots scattered onto the background.
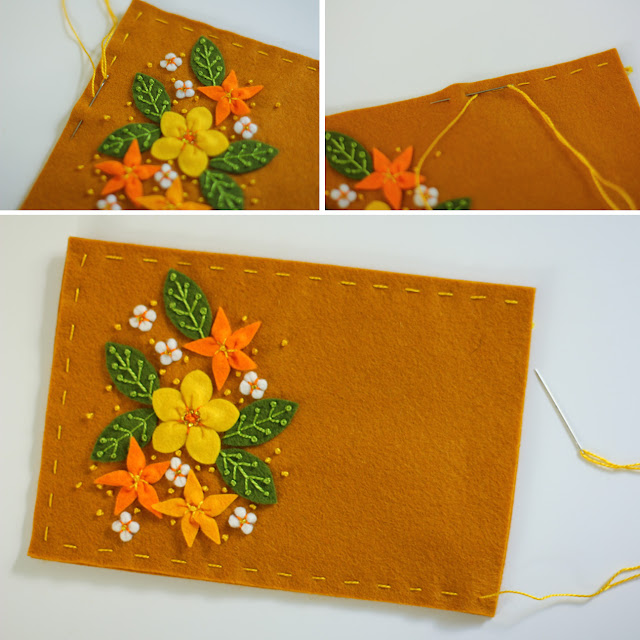
The embroidery is finished, now you’ll need to sew the front and back together to make the pin cushion. Use perle cotton and make a running stitch (about 1/4″ stitch length) all around the outside about 1/4″ from the edge. Leave one side open to allow for stuffing.
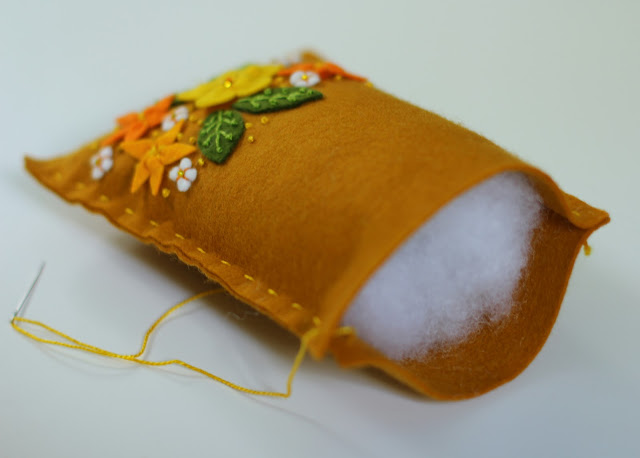
Lightly stuff the pin cushion and close up the open edge by continuing the running stitch.
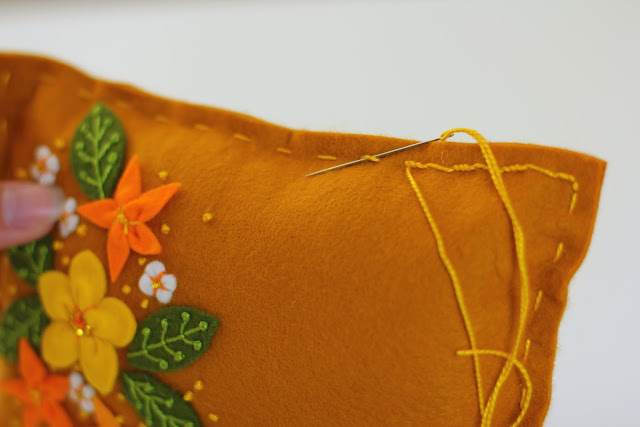
Now, go back around the pin cushion and wrap the perle cotton around each stitch three times to create a decorative edge.
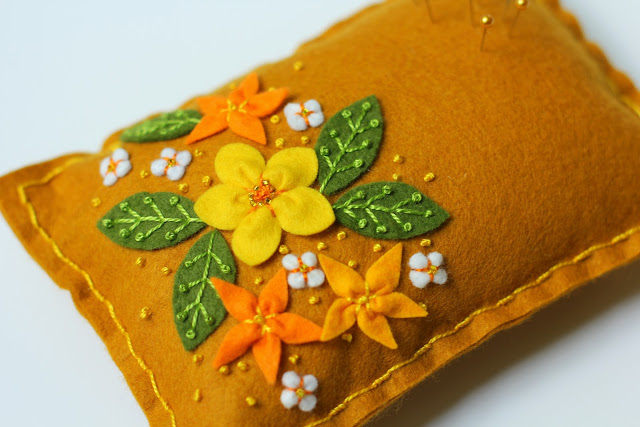
That’s it! Now you have a cute pin cushion to use while stitching up your next sewing project.
I hope you’ve enjoyed seeing how to make this unique pin cushion!
Please visit the Twin Fibers blog to see more of what I’ve been up to and the Twin Fiber etsy shop for a Flower Power Pin cushion kit of your own!
Well, today Carolina turns it all around and shows us just the opposite. Love it!! So, let’s give a warm welcome to Carolina from Always Expect Moore and get stitching.

I’m so excited to be guest posting here at The Sewing Loft today! I first started sewing when I was about 7 years old, on a My Little Pony chain stitch machine. When I was 13 I went to quilt camp. At 16 I took garment sewing lessons. Even though my mother is an amazing seamstress, she let me learn from others and waited patiently for me to come to her to ask questions. In that way she fostered my love of sewing. Now, I blog about crafting and sewing at Always Expect Moore and even teach sewing and quilting classes at my local quilt shop!
When Heather told me that she was looking for sewers to share tools, I knew I had to share the seam ripper. The challenge was to come up with a project that intentionally uses a seam ripper… though many of my projects unintentionally use one!
First, I thought I would share with you some tips for the traditional way to use a seam ripper:
Now on to today’s tutorial! I go to conferences or other events where I need a name badge. Sometimes I want a second name badge to highlight my twitter handle or something about me, but don’t want to wear a second lanyard. Sometimes I only need one badge, but it is handy to have a loop where I can attach my keys to keep them handy, or clip a pen for easy access. This lanyard adjusts depending on what I need to use it for… and is super cute to boot!
What you’ll need is some fabric, coordinating buttons (I used 6 buttons that are all different, which is fine, but they should be roughly the same size), a lanyard clip or other fastener for one end and a large key ring for the other, and a turning tool (or safety-pin). Plus… have your seam ripper handy!

I started with a 3″ x WOF (that means “Width of Fabric”) strip, folded it in half, right sides together (RST), to make 1.5″ x WOF and stitched down the raw edge.

I used my turning tool to turn the tube right side out, and then pressed it flat with my iron.

Using a contrasting thread, I stitched 1/8″ away from the edge on both sides.

4″ from each end, I marked 6 dots, each 2″ apart.

Using my buttonhole foot, I stitched a buttonhole at each dot on one end of the strip. If you have one of these buttonhole feet and don’t know how to use it, search YouTube for a tutorial on how to use it for your brand sewing machine – you’ll be glad you did. These are awesome!

Here is where you get out your seam ripper. At one end of the buttonhole, put a pin perpendicular to your stitched hole. Insert your seam ripper at the other end, and carefully pull towards the pin. The pin will serve as a “stop” so that you don’t rip right through the other end of the buttonhole.

Once you’ve cut open all the buttonholes, stitch a button on each of the marks you made on the other end of your fabric strip.

Trim off the raw ends of fabric, fold the end over twice, slip the hardware on each end, and pin in place. Stitch where you have pinned – I used a small zig-zag stitch.

Once you’re done you can slip a couple of the buttons into buttonholes to adjust the two ends of your lanyard!


