Flower Pin Cushion
I’d like to thank Heather for asking me to participate in sharing one of my favorite sewing tools! Something that I use all the time while sewing is a pincushion. Today I’m sharing with you how to make your own Flower Power Pincushion. This one is designed after the vintage felt embroidery kits that I’ve enjoyed making over the years. You can hand cut all the pieces out of wool felt, but I also have some kits in my etsy shop that I’ve put together that include all the pre-cut wool felt shapes and supplies (including felt, needles, threads and beads) that you’ll need to make a pin cushion! Let’s get started:

Here are the supplies that you’ll need to gather:
2 – 5.5″ x 8″ pieces of wool felt for background
5 green wool felt leaves that measure about 1.5″ x .75″
1 wool felt flower that measures 1.75″ in diameter
3 star wool felt flowers that measure 1.5″ in diameter
5 wool felt circles that measure .5″ in diameter
perle cotton (size 8) in various colors for stitching leaves and flowers
2 strands of embroidery floss for stitching seed beads
seed beads
a crewel needle and a beading needle
stuffing

Use the flower shapes and leaves that you’ve cut out of wool felt and place them to the left side on one piece of background fabric (as pictured). I started with embroidering the leaves and pinned each of them in place so that they would stay put while working on a leaf. Embroider the vein pattern in each leaf with perle cotton and the crewel needle. Add a french knots to the end of each vein.
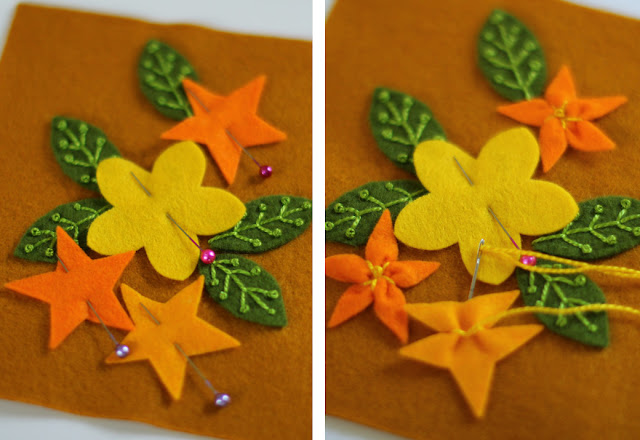
Next, I pinned the large center flower and star flowers in place. Attach each flower by coming up through the center of motif and crimping each petal by bringing yarn around the motif and stitching through the background close to the center. Repeat the step to crimp each petal of the flower and give it a 3-dimensional look. Embroider one french knot in the center of each star flower and three french knots in the center of the large flower.
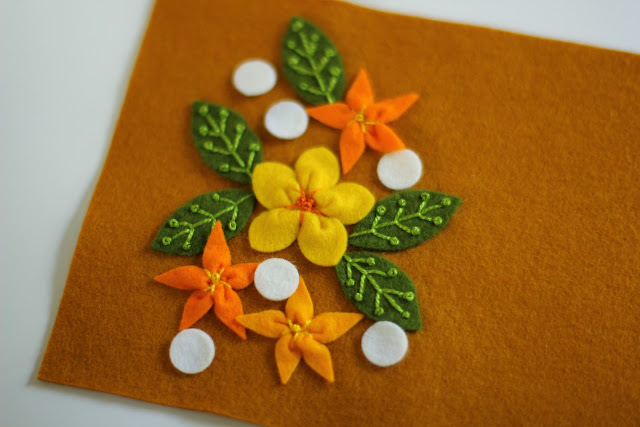
Now, add in the small circle flowers and stitch them on as you did the larger flowers, dividing each circle into four petals.
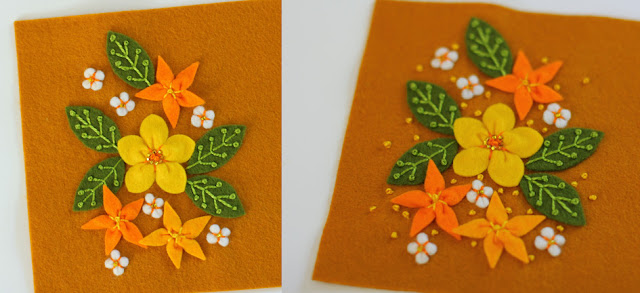
Now, it’s time to add the seed beads. Using the beading needle and two strands of embroidery floss, stitch one seed bead to the center of each circle flower and about 8 beads around the three french knots of the large center flower. Use perle cotton and the crewel needle to embroider french knots scattered onto the background.
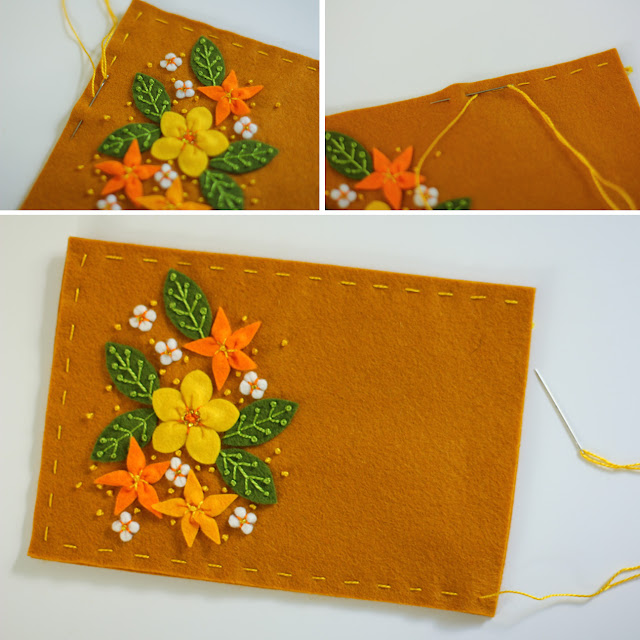
The embroidery is finished, now you’ll need to sew the front and back together to make the pin cushion. Use perle cotton and make a running stitch (about 1/4″ stitch length) all around the outside about 1/4″ from the edge. Leave one side open to allow for stuffing.
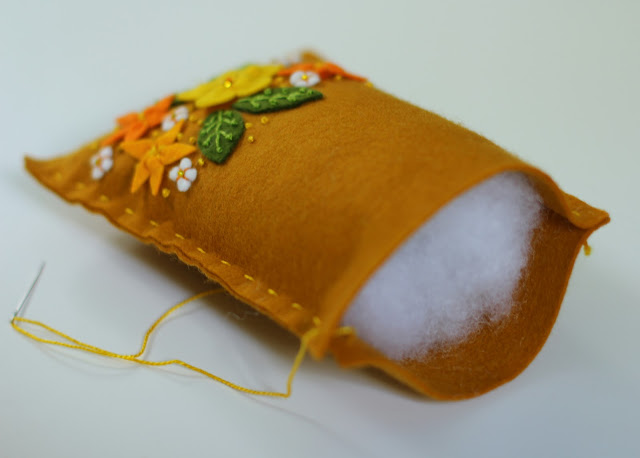
Lightly stuff the pin cushion and close up the open edge by continuing the running stitch.

Now, go back around the pin cushion and wrap the perle cotton around each stitch three times to create a decorative edge.
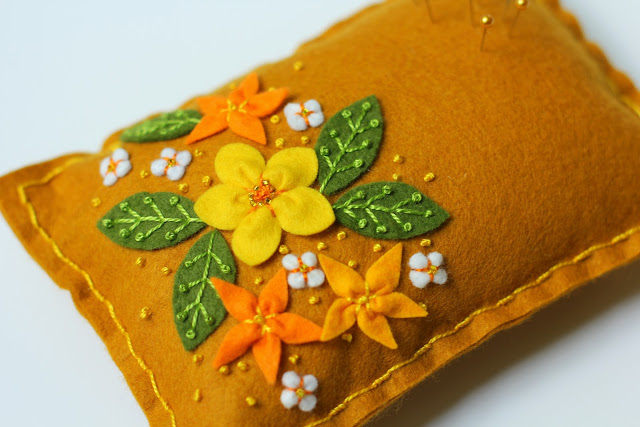
That’s it! Now you have a cute pin cushion to use while stitching up your next sewing project.
I hope you’ve enjoyed seeing how to make this unique pin cushion!
Please visit the Twin Fibers blog to see more of what I’ve been up to and the Twin Fiber etsy shop for a Flower Power Pin cushion kit of your own!
I’d like to thank Heather for asking me to participate in sharing one of my favorite sewing tools! Something that I use all the time while sewing is a pincushion. Today I’m sharing with you how to make your own Flower Power Pincushion. This one is designed after the vintage felt embroidery kits that I’ve enjoyed making over the years. You can hand cut all the pieces out of wool felt, but I also have some kits in my etsy shop that I’ve put together that include all the pre-cut wool felt shapes and supplies (including felt, needles, threads and beads) that you’ll need to make a pin cushion! Let’s get started:
Here are the supplies that you’ll need to gather:
2 – 5.5″ x 8″ pieces of wool felt for background
5 green wool felt leaves that measure about 1.5″ x .75″
1 wool felt flower that measures 1.75″ in diameter
3 star wool felt flowers that measure 1.5″ in diameter
5 wool felt circles that measure .5″ in diameter
perle cotton (size 8) in various colors for stitching leaves and flowers
2 strands of embroidery floss for stitching seed beads
seed beads
a crewel needle and a beading needle
stuffing

Use the flower shapes and leaves that you’ve cut out of wool felt and place them to the left side on one piece of background fabric (as pictured). I started with embroidering the leaves and pinned each of them in place so that they would stay put while working on a leaf. Embroider the vein pattern in each leaf with perle cotton and the crewel needle. Add a french knots to the end of each vein.

Next, I pinned the large center flower and star flowers in place. Attach each flower by coming up through the center of motif and crimping each petal by bringing yarn around the motif and stitching through the background close to the center. Repeat the step to crimp each petal of the flower and give it a 3-dimensional look. Embroider one french knot in the center of each star flower and three french knots in the center of the large flower.
Now, add in the small circle flowers and stitch them on as you did the larger flowers, dividing each circle into four petals.

Now, it’s time to add the seed beads. Using the beading needle and two strands of embroidery floss, stitch one seed bead to the center of each circle flower and about 8 beads around the three french knots of the large center flower. Use perle cotton and the crewel needle to embroider french knots scattered onto the background.

The embroidery is finished, now you’ll need to sew the front and back together to make the pin cushion. Use perle cotton and make a running stitch (about 1/4″ stitch length) all around the outside about 1/4″ from the edge. Leave one side open to allow for stuffing.
Lightly stuff the pin cushion and close up the open edge by continuing the running stitch.
Now, go back around the pin cushion and wrap the perle cotton around each stitch three times to create a decorative edge.
That’s it! Now you have a cute pin cushion to use while stitching up your next sewing project.
I hope you’ve enjoyed seeing how to make this unique pin cushion!
Please visit the Twin Fibers blog to see more of what I’ve been up to and the Twin Fiber etsy shop for a Flower Power Pin cushion kit of your own!

No comments:
Post a Comment