I just bought myself a new laptop! Actually I didn’t even have a laptop before that, just a desktop, which is silly for a blogger who makes a living on a computer. I am loving having a laptop. I have discovered the joy of heading to a local bakery, getting hot chocolate and working for a couple of hours while all of my kids are in school. It’s fantastic! When I take my laptop, it’s handy to have a sleeve to slide it in to protect it when I am on the go. This laptop sleeve can be made in about 10 minutes. And it costs less than $5 to make!

It’s just a simple felt sleeve that will fit around your laptop-no matter what size-and velcro closed and then slide into a bag for you to take with you.

Seriously, this thing is simple.

LAPTOP SLEEVE PATTERN:
Supplies Needed:
About 1/2 yard of felt (this could vary slightly depending on the size of your laptop. Get more if you want to be safe.)
Small pieces of Velcro
Instructions:
Start out by laying your laptop on your felt. You will want to cut a piece of felt that is about an inch and a half wider than your computer, or in other words, has a 3/4 inch excess on each side of your computer.
So my computer is 12 1/2 inches by about 9 inches, so I want my sleeve to be about 14 inches by 10 1/2 inches.

I doubled up the felt to make the sleeve more cushiony. If you prefer a slimmer sleeve, just do one layer. I will continue this tutorial assuming that the double layer.
Cut 2 pieces according to the measurements above that will work for your computer.
Then cut 2 more pieces that are the same width but are about 6-7 inches longer. This will create your flap.
Pin all 4 pieces together with the two smaller ones in front and the two bigger in back. (Note-I rounded out the corners on mine because I like the look of round corners better. You can do this if you would like or leave them square.)
Sew all the way around the outside of the case. Part of this will have you sewing through 4 layers and part through just 2. Use as small of a seam allowance as you can.

Then you will need to sew across just the two layers that go across the middle, being careful that you ONLY sew through those two and not the rest of the sleeve. Sorry, forgot to take a picture of how to do this, but here is one from another tutorial that is the same idea:

Sew across that center section.
Then, trim the excess all the way around the sleeve to give it a nice, straight, clean finish.
Grab your Velcro pieces and figure out where you want them. Two will go on the underside of the flap near the top and then fold the flap down and mark where they meet up with the sleeve and sew your other pieces there:

And that’s it! You are already done! Hopefully that was quick and easy for you and hopefully you can really enjoy this sleeve! Grab some hot chocolate while you work on your laptop. It makes life happy!


You Might Also Like:


So after Saturday's bow-spiration moodboard, I'm sure you're itching to make yourself one or two or a thousand. Well, no need to fear, here is a quick and easy tutorial for making your own fabric bow. It might look like a lot of steps but it's really fast and easy. And, it only takes a little bit of fabric. I used scraps leftover from this refashion. Let's get started!
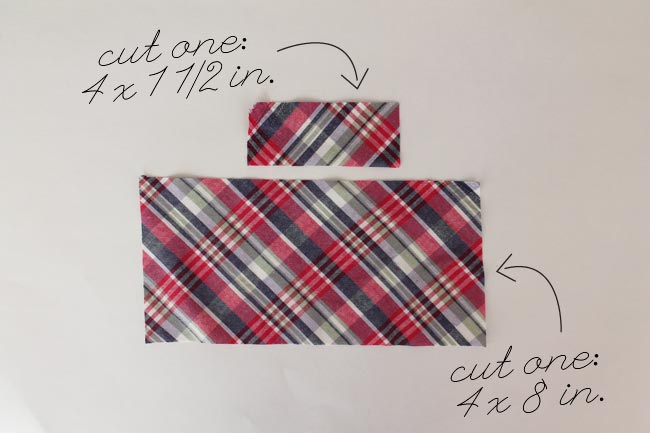 Step 1: Cut one piece of fabric 4 x 8 inches and one piece 4 x 1.5 inches. The small piece will be the center band that holds it all together and the big piece the bow itself. This size makes a bow about 3.5 x 1.75 inches.
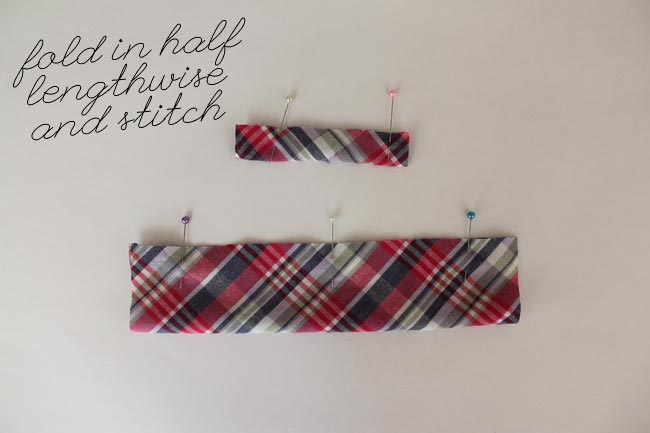 Step 2: Fold the fabric pieces right sides together so that the long edges meet. Stitch the long edges using a 1/4 inch seam allowance.
 Step 3: Turn the pieces right side out. For the band (small tube), attach a safety pin to one end, push the pin inside the tube and pull out the other end.
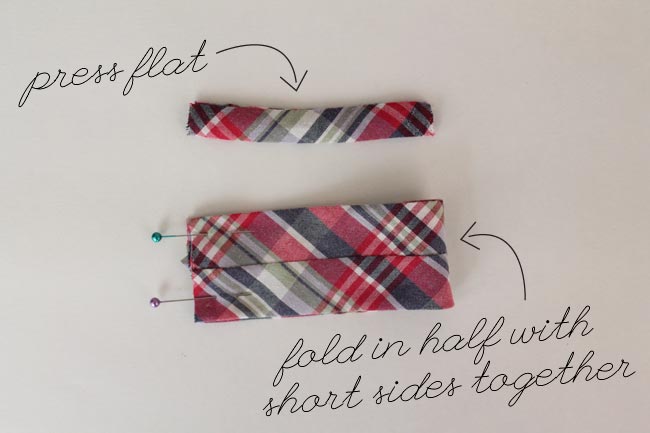 Step 4: Press the band flat with the seam along one edge. Press the bow flat centering the seam in the middle. The side with the seam is the wrong side. Fold the bow in half, right sides together so that the short ends meet. Stitch the short ends together using a 1/4 inch seam allowance.
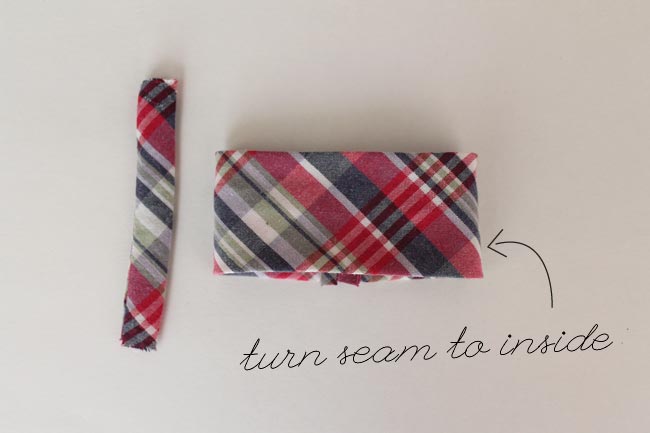 Step 5: Turn the seam to the inside and center it in the fabric circle. The side with the seam is the back of the bow.
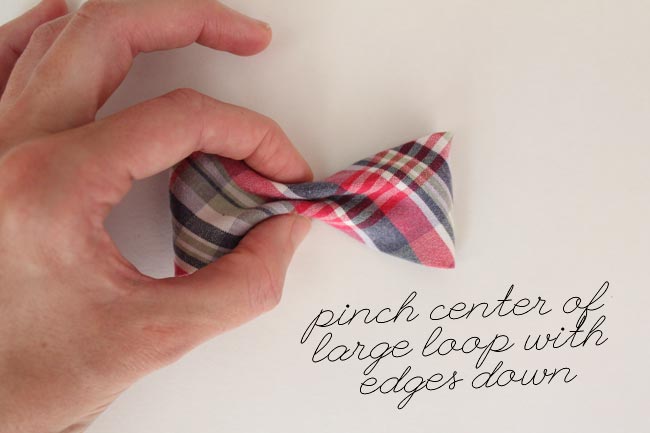 Step 6: Pinch and fold the bow in the center with the edges angled down. The shape of the folds is kind of like a double humped camel or an "M".
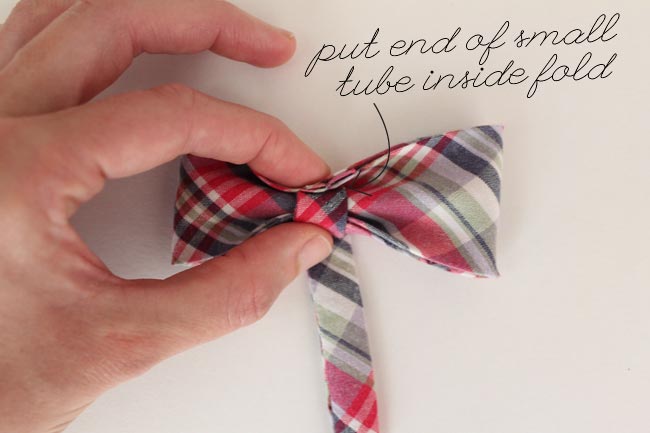 Step 7: While holding the bow in position, put one end of the band inside the fold of the bow on the back side. Wrap the band tightly around the bow and trim away excess.

Step 8: Fold raw edge under and pin. Slip stitch the band in place.
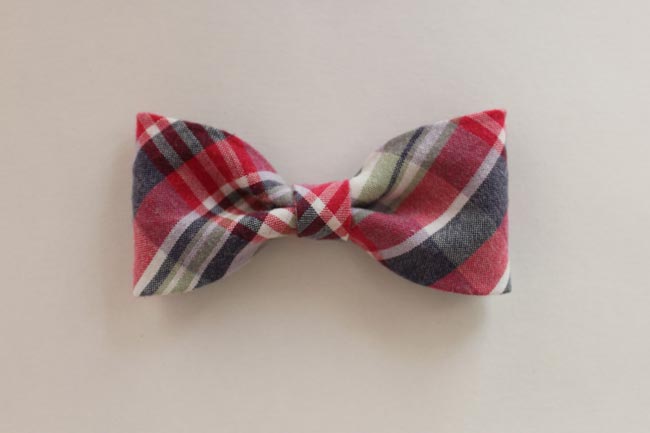 You now have a lovely little bow! Use the bow to embellish a headband, purse, dress, pocket or even your shoes! Experiment with different fabrics and sizes to fit your needs. Obviously, if you want a bigger bow, cut bigger fabric. I cut the fabric on the bias because it looks cool with the plaid. But it's not necessary. A medium weight cotton is probably the easiest to work with but you could you anything you wish. Remember, the weight of the fabric will also determine how stiff your bow is. If you want an extra stiff bow you could apply interfacing to the fabric. I hope you enjoy this little tutorial!
credit:sewdiy.com
It's getting to be that time of year again . . . Girls Camp is fast approaching. In the past I have been busily preparing devotionals, costumes and treats for my girlies in my own Young Women group at church. This year I have been given charge of the whole craft cabin. It's like a dream come true, I tell you. Not only do I get to coordinate all the craft projects that all the girls will be doing at camp, I get to decorate the craft cabin and my committee of crafty ladies. Yes, I said decorate my committee. Hence today's project.
The theme for camp this year is Defy the Odds: Hunger for Righteousness. The Hunger Games? How fun is that?! Each group at camp is a different district and Crafts is {perfectly} District 8 or Textiles. I am using old sewing patterns as table covers and I wanted to incorporate lots of fabric into our decor. I thought it would be fun for all the workers to have something that identifies us as the helpers the girls can turn to. That's where these fun tiered ruffle aprons come in.

Each one only took me about 30 minutes to make. Here's what you'll need:
1 piece of fabric 25-inches x 16.5-inches for base of apron {This fabric doesn't show so it can be muslin or something very plain and inexpensive.}
4 strips of fabric 7-inches wide by the width of your fabric from selvage to selvage {about 42-inches usually} for ruffles
2 yards of 1.5-inch wide grosgrain ribbon for waistband and ties
coordinating thread
STEP 1: Make a narrow rolled hem on three sides of each piece of fabric {the two short sides and one long side.}
STEP 2: Gather the unfinished edge of your four long fabric strips to form ruffles.
STEP 3: For evenly spaced ruffles without a ton of measuring, fold your base fabric piece in half by bringing the bottom hem up to the unfinished edge and pressing the fold with an iron to crease the fabric. Fold fabric in half again by bringing the crease you just pressed up to the unfinished edge and pressing the new fold into a crease. When you unfold your fabric you will have 3 pressed lines, like this:

Each crease will act as a sewing line for your lower three ruffles. The fourth ruffle will align with the top of the fabric. So easy, right?
STEP 4: Lay fabric wrong side up on your work table. Beginning with your bottom ruffle, lay your strip of gathered fabric wrong side up on top of base fabric along the crease closest to the hem. Here's where it gets a teeny little bit confusing. Pin the ruffle on so that it seems like it's upside down as shown here:

This way, once you sew it in place you can flip the ruffle down and hide the raw edge under the ruffle. So go ahead and sew it in place, flip it down and press it so it lays nicely,
STEP 5: Repeat step 4 for the next two ruffles.
STEP 6: When you get to the top ruffle we're gonna' switch it up and confuse you again. Lay your apron base on your work table so that the ruffles are down. Align the raw edge of your top ruffle right side down with the raw edge of the apron base on the opposite side from the other ruffles, as shown:

Sew it in place then flip the fabric all the way over the top so it hangs with the other ruffles and press it in place.
STEP 7: Line up the center of your ribbon with the center of your apron and pin across the top edge. Stitch in place as shown:

That's it, y'all!! Simple enough to make and so happy-looking. How could you be sad wearing an apron like that?

I conned Sis into modelling it for me {and all of you}. It's so fun and girly she wants a whole skirt just like it! She'll probably have to wait until after camp for that . . .

I love aprons, but what do you guys think? Do you wear aprons when you cook and/or clean or is that just too 1950's for you? Rest assured you'll be hearing more about my Girls Camp experience in the weeks to come. Have a great weekend, friends!
credit: my3monsters.com
This post is part of the Sew Basic Series (remember the fabrics 101 + heatpad and the tools & notions posts?)
If you need some help visualizing on your sewing machine (or if you still don’t have one but you’d like to start learning) all the tools and knobs below, check my Sewing Machine: Dissected! Part 1 and Part 2: a lot of pics and descriptions are there Just For You (opens in a different tab!)
Now, you’ve decided to start the most rewarding crafting in the world (am I partial to this?), could you use some of my top sewing tips (listed in strictly random order)?
Sewing Tip #1. Say: “Cheese!”
Snap some shoot to existing threading, just to be sure you’ll be able to re-thread when you’ll need to (and you’ll need it soon, promise!)
Sewing Tip #2. Leave the thread guide up
This is an important tip! When you start sewing, the thread guide right above the needle have to be in its higher position.

If it’s not, as soon as you’ll turn the handwheel to start (see next step) the needle will unthread!

To be sure you’ll never skip this step, I’d suggest you to create a habit of checking it
Every. Single. Time.
you stop sewing (and eventually turn your hand wheel to put the thread guide in its higher position)!
Sewing Tip #3. Start by Hand
To be sure everything is perfect while you start, always do the first 1-2 stitches turning your hand wheel anticlockwise, so you can check if the needle is getting smoothly in the fabric, see if your fabric’s thickness is a problem (think hemming your jeans!), and avoid thread jams, plus, you’ll accurately define the first stitch placement.
Sewing Tip #4. Keep it down!
Never stop with your needle up, out of the fabric,while sewing a corner or when you need to slightly move the fabric (such as in a curved seam) or to pull out a pin.
Leaving the needle down and pivoting in the fabric, will help you to achieve a perfectly aligned seam.

Sewing Tip #5. When things goes bad, rethread
This is a rule, whenever you find in your seam a thread too tight or too loose, or your machine is skipping stitches, try rethreading everything, spool and bobbin (also if you think it’s all perfect!) – 99% of the times you’ll solve your problems!
To help yourself, keep the pics you took in Tip 1 on your phone or tablet, ready to check!
While you’re repositioning the bobbin, check for lint/bird’s nest right below the needle plate… this is often what causes thread wonkyness or missing stitches!
Sewing Tip #6. Check needle type and conditions
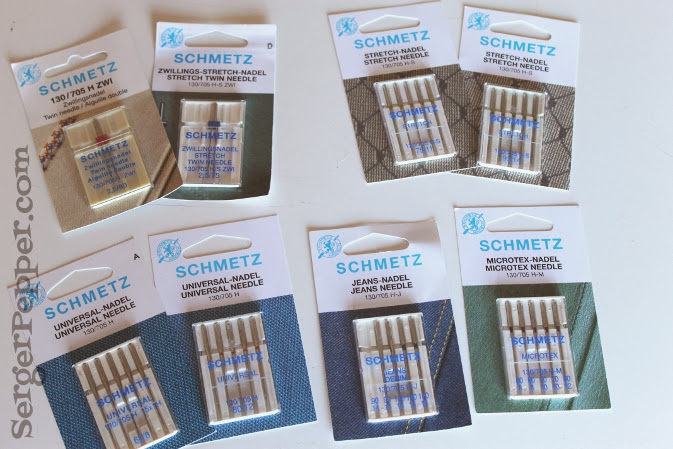
While an Universal needle can be perfect for starting (a n° 90-14 will be the right choice), with special kinds of fabric you’ll better choose the proper needle:
lightweight fabrics (like sheers or thin cottons) want a smaller needle (n° 60-8 or 70-9)
with thicker fabrics like denim, better use a bigger needle (like 100 or 110!)
to hem with a coverlock look (if you don’t know what it is, simply look at your double row t-shirt hem!), a twin needle will be your best friend 
The most important kind of needles, for me, is the knit/stretch/jersey one: we call them ballpoint needles because they have a rounded tip that goes between knitted threads, separating them; if you use a Universal needle, chances are that you’ll end with unwanted holes in no-time… believe me or not!

If you need a visual reminder, check this guide, pinned in my “Sewing for Beginners” Board in Pinterest!
One more thing: always use a sharp/new needle – a bent or over-used needle can create a thread jam and suckyour fabric inside the needle throat or (worst) break and spring into your eyes!
Sewing Tip #7. Check thread type
A rule of thumb is to use the same thread type in both bobbin and spool (unless you need to use embroidery thread, that will go only in your spool).
There’s no problem using different colors in your upper and lower thread (and it’s nice when you are topstitching a lined dress, to match both outer and inner fabric’s color with thread), but choose them from the same family (no polyester spool and cotton in the bobbin…) to avoid thread jams or breakages.
Sewing Tip #8. Clean her!
This sewing tip is a rule for your sewing machine health and longevity: try using an air duster or, better, acompressor to blow out any tiny thread or lint, hidden inside your sewing machine.
Check your sewing machine’s manual to see if you can unscrew something to clean your machine more in-depthand if you have to oil it and where.
Check this FREE Craftsy lesson or this one to learn more!
Sewing Tip #9. How to sew a straight line
The trick is: never look at your needle! Being steadily in movement, can’t be a focal point for your eyes, it would be confusing!
Measure your seam allowances distance from the needle and (if your needle plate is missing those tiny parallel etched straight lines) mark the one you need on the needle plate somehow (an elastic band, Washi tape, painter’s mask tape, sticky notes are all perfect candidates!), creating a repositionable seam guide.
Try now to keep your fabric’s edge aligned to your improvised seam guide, then admire your straight seam!
Sewing Tip #10. Try on scraps first
When you cut out your pattern pieces, never throw away your fabric’s scraps, but keep them for practicing (and calibrating) your stitchings!
From left to right you can see I’ve adjusted stitch length and width to have a perfect decorative stitch!
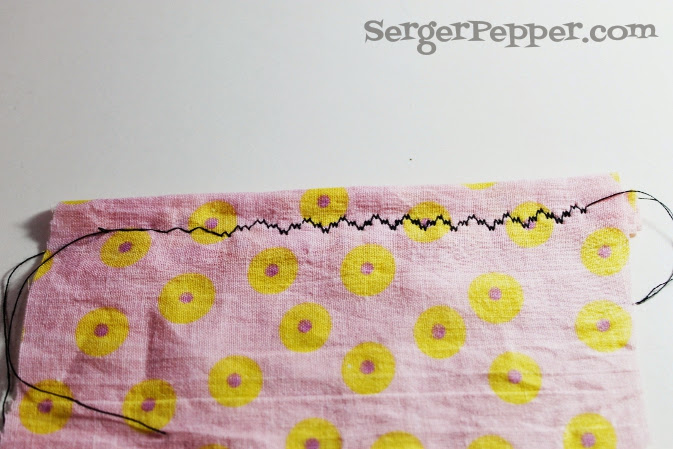
Nobody can sew perfectly the first time that tries, and a seasoned seamstress too will choose to try a particular stitch or a stressful kinds of fabric (think slippery sheers, or buttonholes in knits…) on scraps before going on garment and eventually ruin her precious fabric!
Always recreate the same circumstances: if you’re going to sew on 3 layers of denim on your garment, practicing in only one layer won’t mean a lot!
Sewing Tip #11. Check the amount of thread on bobbin
…this may sound silly to you but, basing on Murphy’s Laws, if you have to guess exactly when your bobbin’s thread will finish, you can be sure that it will happen right in the middle of a princess seam (or any other complicated stitching), and you’ll notice it only after 30 cm of unlocked stitching….
Been There, Done That, Got the T-shirt 
Better change this nearly empty bobbin if you need to sew a challenging part of your garment!

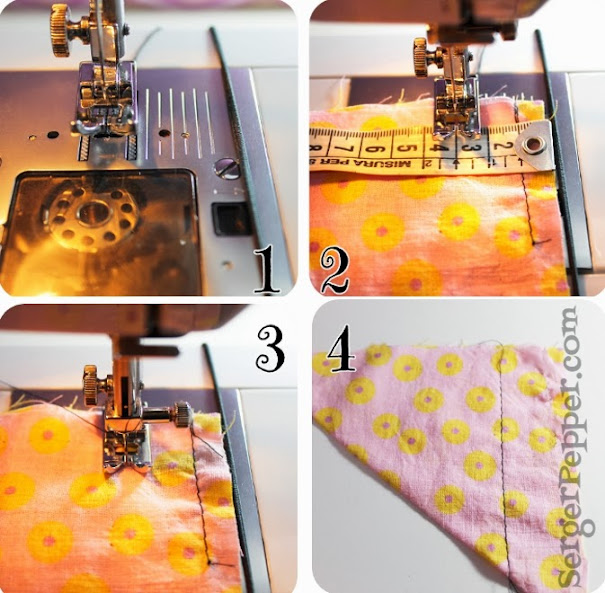
Sewing Tip #12. Go Back & Forth
Start 1/2 cm inside your fabric edge, backstitch, then sew the seam: you’ve just fixed your seam’s head!
Do the same at the other end of the fabric: when you reach the edge, reverse your sewing machine direction, sewing a couple of stitches, then cut the thread tails.

In some particular situation (like on a dart’s head, for example) it’s better to simply sew off the edge leaving long thread tails, knot tails together then shorten them.
Sewing Tip #13. Lefties
To avoid messes (imagine your sewing machine needle throat gobbling your fabric, forcing you to cut a hole in the fabric… ask me why I know that…) start any seam holding threads tails on your left hand.
This is mostly important on lightweight fabrics and/or knits that are more apt to be swallowed!

Believe me, it’s not a good thing when it happens, and you have to re-cut two pieces of your pattern… and have no more fabric…
Can you see me tear my hairs out?
Sewing Tip #14. Control your speed!
Especially when you are a beginner, it’s better to go slowly, never push your foot down the pedal!
A little (but of a certain weights) sewing tip I learnt a long time ago (and I want to share with you now) is to put your naked (or with sock, if you live in a cold country, like me) foot on foot pedal: this gives you much more control than if you were wearing shoes!
Sorry – no pics of my naked foot LOL
Sewing Tip #15. Never skip a good press
One of the most important things to learn is how to properly press seams while you sew: this make the difference between (poorly) homemade and (shining) handmade!
You should never cross a seam with one other seam if the first isn’t pressed (either opened or to one side, as per instruction’s request)
