

A detachable collar is perhaps the easiest way to “bling” an outfit and make it more elegant without having to go and spend a whole bunch of money on jewelry. A removable collar is also a great alternative to the current trend of chokers that are in every jewelry store these days –at least in my corner of the world.
Here is a super easy way to make one that will take you only a short time, few supplies and little money to make.
When making this collar, you should take into consideration the venerable Fibonacci sequence which is a pillar of design
and even architecture. This sequence of numbers is found all around nature and using it in your designs will make them really stand out. We are more in tune with nature than you think and our brain recognizes balance and symmetry –which is illustrated in the Fibonacci sequence– and finds it beautiful. I have chosen to work with the number “5”, but “3” also works very well. Of course, as always, please do what you think works best for you.
Materials for the Detachable Collar:
You will be using a scrap of paper, but if you are buying online I need to give you the minimum amount stores will sell you.
- 1 1/4″ yard of 1 1/2″ Venice lace (this is the actual amount and this is the lace I used in the pictures.)
- 1/4 yard of fabric (satin, cotton batiste, linen), neutral color.
- 1/4 yard of light fusible interfacing
- thread to match
- 1 1/2″ yard of 1/4″ ribbon to match.
- 5 Swarovski pearls 5mm to 6mm (optional)
- french curve ruler (you should really get one of these if you're planning on building your pattern making skills)
- sewing needle
- pencil or heat erasable pen
There is no pattern for this project, so I'm going to teach you how to draft a basic pattern yourself. The measurements given are for a person with a neck measurement that is 13 1/2″ to 15″. You'll be able to draft this pattern straight on the fusible interfacing but you can use paper to make the pattern if you like.
These measurements include a 1/4″ seam allowance on all sides.
Fold your fusible interfacing or paper in half. Working on the fold and on the horizontal line. Mark a line that is 2 3/8″ to the left.

Working on the vertical line. Mark a spot 3″ down.

Using your french curve ruler, join these two marks by making a curve.

Mark 2 3/8″ from the curve.

Using the curve continue to mark this measurement to make a curve that is 2 3/8″ from the first curve.


Use your french ruler to draw the curve and cut.

Round up the curve with your french ruler.

Fold back in half. At the neckline, mark a point 1/4″ from the edge. From this point to the opposite corner draw a line and cut.

Step two: Cut the fabric and the lining using your pattern
Cut on fold both fabric and fusible interfacing.
Sewing tip: If using satin, fuse the interfacing to the satin before cutting the fabric.
Step three: sewing the collar
Right sides together. Sew the bottom at 3/8″ if you are size 15 and 1/4″ if you are around 13 1/2″.

Sew the top at 3/8″ if you are size 15 and 1/4″ if you are around 13 1/2″. Trim the seam allowance by half.

Fold the ends 1/4″ in, iron and insert the ribbon.

Sew at 1/8″. At this point, you have a blank canvas. If you have a fancy embroidery machine, I suggest you add a border to your the bottom and top of the collar. I think it will look even more elegant.

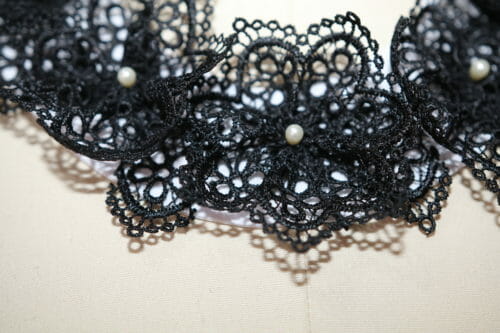
Step four: Cutting and sewing the laceIf you are using another kind of lace than what is recommended, make sure your lace is stiff. You can use fabric stiffener before you make the flower if you need to.
If you're using the recommended lace, you will need to cut seven segments of the lace for five smaller flowers or eight segments of the lace for three larger flowers. You can, of course, vary this if you want. You could even do some large and some small but that is completely up to you.
For lace other than the recommended, you will need 7 1/2″ of lace for five smaller flowers and or 8 1/2″ of lace for three larger flowers. The lace needs to have scallops or edging that creates segments like the lace I used for the flowers to really form properly.

Thread the needle with four strands of thread. Make a knot at the end. Using a running stitch and sew the side of the lace making a circle.

Using the same kind of stitch 1/4″ apart, sew at the bottom of the lace and pull to gather the lace.


Sew at least five times back and forth to secure the gathers.


Put aside and make the rest following the same steps.
Step five: Sewing the flowers on your detachable collar
Find the middle of the collar and sew the first flower.

Sew the second one next to it and the next one to the opposite side of the first one. I think you know where I am going with this so just continue on. Work your way up the collar work from the center.
 I
I have cut some segments of lace off and will be adding them in the middle of the flowers so the white collar can not be seen too much.

Lastly, I have sewn some Swarovski pearls in the center of the flowers for a bit of pop and voila! A boring top becomes much more interesting!
As I finish this tutorial, I rummage in my box of lace and find some interesting candidates to make at least four more collars. I will be sharing these with you over the next few weeks. In the mean, see what you can find in your sewing stash to adapt this collar to your sewing supplies.
Until next time and happy sewing!
credit:so-sew-easy.com
No comments:
Post a Comment