Showing posts with label
#alborj #sewing #machine #needle #thread #stitching #fashion #newlook #SewingTips#sewingessential #homedecor.
Show all posts
Showing posts with label
#alborj #sewing #machine #needle #thread #stitching #fashion #newlook #SewingTips#sewingessential #homedecor.
Show all posts
 A detachable collar is perhaps the easiest way to “bling” an outfit and make it more elegant without having to go and spend a whole bunch of money on jewelry. A removable collar is also a great alternative to the current trend of chokers that are in every jewelry store these days –at least in my corner of the world.
 Here is a super easy way to make one that will take you only a short time, few supplies and little money to make.
When making this collar, you should take into consideration the venerable Fibonacci sequence which is a pillar of design
and even architecture. This sequence of numbers is found all around nature and using it in your designs will make them really stand out. We are more in tune with nature than you think and our brain recognizes balance and symmetry –which is illustrated in the Fibonacci sequence– and finds it beautiful. I have chosen to work with the number “5”, but “3” also works very well. Of course, as always, please do what you think works best for you.
Materials for the Detachable Collar:
You will be using a scrap of paper, but if you are buying online I need to give you the minimum amount stores will sell you.
- 1 1/4″ yard of 1 1/2″ Venice lace (this is the actual amount and this is the lace I used in the pictures.)
- 1/4 yard of fabric (satin, cotton batiste, linen), neutral color.
- 1/4 yard of light fusible interfacing
- thread to match
- 1 1/2″ yard of 1/4″ ribbon to match.
- 5 Swarovski pearls 5mm to 6mm (optional)
- french curve ruler (you should really get one of these if you're planning on building your pattern making skills)
- sewing needle
- pencil or heat erasable pen
Step one: Drafting the base
There is no pattern for this project, so I'm going to teach you how to draft a basic pattern yourself. The measurements given are for a person with a neck measurement that is 13 1/2″ to 15″. You'll be able to draft this pattern straight on the fusible interfacing but you can use paper to make the pattern if you like.
These measurements include a 1/4″ seam allowance on all sides.
Fold your fusible interfacing or paper in half. Working on the fold and on the horizontal line. Mark a line that is 2 3/8″ to the left.

Working on the vertical line. Mark a spot 3″ down.

Using your french curve ruler, join these two marks by making a curve.

Mark 2 3/8″ from the curve.

Using the curve continue to mark this measurement to make a curve that is 2 3/8″ from the first curve.


Use your french ruler to draw the curve and cut.
 Round up the curve with your french ruler.
 Fold back in half. At the neckline, mark a point 1/4″ from the edge. From this point to the opposite corner draw a line and cut.

Step two: Cut the fabric and the lining using your pattern
Cut on fold both fabric and fusible interfacing.
Sewing tip: If using satin, fuse the interfacing to the satin before cutting the fabric.
Step three: sewing the collar
Right sides together. Sew the bottom at 3/8″ if you are size 15 and 1/4″ if you are around 13 1/2″.

Sew the top at 3/8″ if you are size 15 and 1/4″ if you are around 13 1/2″. Trim the seam allowance by half.

Fold the ends 1/4″ in, iron and insert the ribbon.

Sew at 1/8″. At this point, you have a blank canvas. If you have a fancy embroidery machine, I suggest you add a border to your the bottom and top of the collar. I think it will look even more elegant.

Step four: Cutting and sewing the laceIf you are using another kind of lace than what is recommended, make sure your lace is stiff. You can use fabric stiffener before you make the flower if you need to.
If you're using the recommended lace, you will need to cut seven segments of the lace for five smaller flowers or eight segments of the lace for three larger flowers. You can, of course, vary this if you want. You could even do some large and some small but that is completely up to you.
For lace other than the recommended, you will need 7 1/2″ of lace for five smaller flowers and or 8 1/2″ of lace for three larger flowers. The lace needs to have scallops or edging that creates segments like the lace I used for the flowers to really form properly.

Thread the needle with four strands of thread. Make a knot at the end. Using a running stitch and sew the side of the lace making a circle.

Using the same kind of stitch 1/4″ apart, sew at the bottom of the lace and pull to gather the lace.


 Sew at least five times back and forth to secure the gathers.

 Put aside and make the rest following the same steps.
Step five: Sewing the flowers on your detachable collar
Find the middle of the collar and sew the first flower.

Sew the second one next to it and the next one to the opposite side of the first one. I think you know where I am going with this so just continue on. Work your way up the collar work from the center.
 I
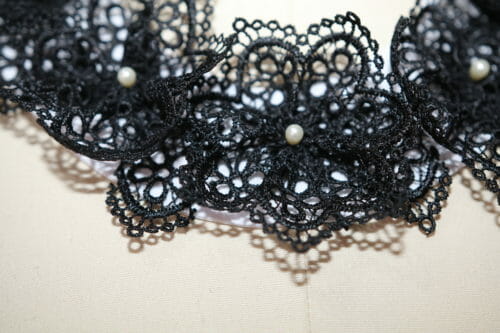
have cut some segments of lace off and will be adding them in the middle of the flowers so the white collar can not be seen too much.
I
have cut some segments of lace off and will be adding them in the middle of the flowers so the white collar can not be seen too much. Lastly, I have sewn some Swarovski pearls in the center of the flowers for a bit of pop and voila! A boring top becomes much more interesting!
As I finish this tutorial, I rummage in my box of lace and find some interesting candidates to make at least four more collars. I will be sharing these with you over the next few weeks. In the mean, see what you can find in your sewing stash to adapt this collar to your sewing supplies.
Until next time and happy sewing!
credit:so-sew-easy.com
One of the most important parts of sewing, (but also sometimes the trickiest to achieve) is sewing straight. Here are four easy tips to help you sew straighter!

1. Get a 1/4" foot for your machine. This foot has an extra piece added along the edge of the foot. When you’re sewing, you simply run the edge of your fabric along that guide sort of like a bumper. This helps you sew a straight 1/4” seam every time.
If your machine doesn't have a 1/4" foot, you can make your own guide. See our instructions here.

2. Sometimes when you start sewing two pieces of fabric together, the pieces can get pushed under the needle at an angle. Try using a little fabric scrap underneath your machine foot when you start. Start sewing right off of that scrap, so you can go straight onto the pieces you’re sewing. It's the perfect way to make sure from the very first stitch that your seam is straight.

3. Slow down. If your machine has an adjustable speed control, move it down to one of the mid-range or slower speeds. It'll give you more control, which can be very helpful in keeping your seams straight.

4. Always use your needle-down option if your machine has that. When you’re sewing and you stop to remove a pin or readjust your pieces, your fabric can slide. If that happens, when you start sewing again, your seam won’t line up. Always stopping with your needle down in the fabric will prevent this. Then when you start sewing again, you’ll start right from where you left off.
credit:howtosew.com

There is no anxiety a sewists dread more than the anxiety that comes when you are snipping away at your precious fabric. The saying “measure twice, cut once” is there for a reason. If you cut your fabric incorrectly, it can ruin a project and it can cost you a ton of money. Fabric is not cheap and if you do not know how to cut fabric properly, it can do some serious damage. It is even harder to learn how to pin and cut a pattern on fabric. You have to cut your fabric to match your piece, ensure that your print is going the right way, and make sure that you cut the right side facing out. Stressed out yet? Don’t worry, sewists. That’s why we are here yet again to help you out. Quick Tips: How to Cut Fabric Perfectly is going to give you the top 5 things you can do to cut fabric perfectly every single time.
Quick Tips: How to Cut Fabric Perfectly
Prepare your fabric: Make sure your fabric is ready to cut before you even thinking about figuring out how to cut fabric for your projects. That means washing (if you are making a wearable) and pressing your fabric to destroy any wrinkles.

Make sure your tools are ready, too!: If you cut fabric with a dull blade or pin it with a dull pin, it is going to do a lot of damage. You want something that will snip the threads in your fabric precisely and not something you have the saw at.
Match your selvages as closely as possible: Oftentimes when you are cutting fabric, your pattern will indicate to fold your fabric in order to trace several pattern pieces at once. Insure that your selvages are aligned perfectly.

Selvage (n.) – the self-finished edge of your fabric aka you best friend when it comes to learning how to cut fabric perfectly!
Listen to your pattern: This might seem like a no-brainer, but it is so important. Patterns are written and created by experts. They are labeled to give you the best project necessary. Most projects will have directional arrows on them that will indicate the direction of the pattern. Make sure these are parallel to your selvage.


Double check before you do anything: So, you have read your pattern, measured your fabric, pinned your pattern, and you are ready to go. The next step is to start cutting, right? NO! Now is the time to double check everything. Lay out your pieces and look them over. Is everything in its place? If so, snip away! If not, good thing you double-checked.

Somewhere along the way you are going to rip or tear a favorite garment. And, if you live in Newfoundland sometimes Mending Holes in Jeans {or any type of garment} becomes a necessary skill.
 When we were in Newfoundland Mr. B asked me if I could fix a tear in his favorite pair of Eddie Bauer cargo pants. For most of us, getting a tear in a pair on pants would mean ordering a new pair of pants and moving on. However, if you live in a very small town on the absolute edge of North America, that might not be possible.
Here’s what we have. A weak spot in the fabric gave way to a tear which pulled away from a very well-sewn seam. This type of tearing happens all of the time on seams with double stitching. The seam holds, but the fabric gives way and makes a tear.
 That means there is no fabric that I can pull into the seam. Since I lack any sort of magical fabric-cloning skills and I have no fabric fairy dust, I am forced to take other measures. What this repair needs is an old fashioned patch. However, notice the location of the tear. Some sort of cute, stand-out fabric patch is going to be ~ well, let’s just say it ~ vulgar. This repair requires fabric that is a perfect match. I am going to have to rob a piece of fabric from somewhere on these pants in order to create a patch.
The last thing I want to do is cut a patch that is too small. First, I measure the size of the tear. That way I can look for places like pockets and hems to find enough fabric for this patch.
 I have decided to try robbing from the underside of the pocket flap. There is just enough fabric on the inside to make a decent patch. Another option would’ve been to take fabric from the back of the pocket. Even after repairing this it still would’ve left a weak spot in the pocket. Since phones and wallets are likely to be in the pocket, I didn’t want to weaken it in any way. The pocket flap seemed like the best option.
 I measured, marked, and cut out the patch. I had hoped to get 2″ x 2″, but had to settle for 2″ x 1.5″. Notice the brass snap. Trying to avoid getting close to the snap was also a huge challenge.

 Cutting out a patch meant I now had two areas to repair. For the inside of the pocket flap I decided to use one of those iron-on patches. I cut it slightly larger than the patch because it was going to only get ironed on and straight stitched down.
 Next, I positioned the patch over the newly made hole and pinned it in place. It’s really hard to tell, but the iron-on patch barely covers the opening.
 Next, I ironed the pocket flap patch according to the package directions.
 Most of the iron-on patches really don’t require any additional stitching. However, they have a tendency to pull away and I wanted to make the pocket flap not look so much like a repair job, so I went with a straight stitch hoping to make it look like there was some sort of tag on the other side. With these types of repairs, you can only do so much, but it is always worth the effort to try and make the repair look as good as possible.
The biggest challenge here was that darn brass snap. I had to rip out my stitches here and there in order to get the patch stitched down.


 On to the real reason these pants need mending. The challenge here is making the patch look natural while still making it strong enough to hold together until the next time Mr. B is able to buy a new pair of pants. I originally thought about adding a woven interfacing to this patch, but I felt like the patch might be too stiff and look unnatural. The idea here is try and make it as natural as possible.
I pinned the patch to the pants. Keep in mind this is a small area next to a heavy seam and my matching fabric patch is pretty small. There was some adjusting in order to get it on there. In most cases I would trim away the frayed fabric. However, this is such a delicate patch I decided to keep it and sew into it, hoping it would help with the fabric blending.
 You know there is no such thing as a thread color called Son-in-LawFaded Loden Cargo Pants. Who knew that finding thread would be the biggest challenge here. Think about it, if the thread is too dark or too light, the patch will look ridiculous.
Sometimes I think the Thread Fairies plant magical thread spools in my thread box. How I had a spool of matching thread is beyond me, but there it was nestled amongst a sea of teal, emerald, and mint green threads. A perfect match.
I put my Open Toe Foot on the machine in order to see exactly where I was stitching. I used a fairly open zigzag stitch and made sure I caught both fabrics.
I tried to keep the repair as subtle as possible. This is the result. I trimmed away some of the frayed threads.
 It’s still a little noticeable, but better than a hole. And, once Mr. B has on a t-shirt and sweater it will be hardly noticeable. Plus, knowing how remote things are in Newfoundland, I suspect lots and lots of folks have to patch and repair their clothes.