

Are slippers a part of your holiday traditions? They certainly are in my family! My kids LOVE to have matching PJ’s and slippers for Christmas morning, and I happily oblige because I love the pictures of them in them!

Why mice? I just couldn’t get the “Not a creature was stirring, not even a mouse…” line from the “Night before Christmas” poem out of my head! I know, I know, it’s only November, but I’m already beginning to feel in the Christmas mood. (And let’s be honest, if I don’t start making Christmas gifts early, there’s NO WAY they are getting done on time. I promised myself I’d get started earlier this year, and so far, so good!)

The mice slippers are lined with sherpa fabric, making them super cozy. They are made of wool blend felt on the outside. The bottoms are non-skid utility fabric, so that little feet don’t go sliding as they run about the house. (I’m pretty sure the word “walk” isn’t in my 4-year-old’s vocabulary.)

It’s the face though that’s my favorite part. I love the simple embroidery.

If mice slippers aren’t really your thing though, you can omit the ears and embroidery to make a basic pair of slippers. You could use colorful fabric, or even make them quilted. The possibilities are endless!
Alright, are you ready to make some slippers?
SUPPLIES:
- 1/2 inch thick craft foam
- “Footie PJ, non-skid” fabric (I found this in the utility section of the fabric store)
- Sherpa fabric for the lining
- Felt (I prefer wool-blend)
- Embroidery floss and needle
- Sewing machine and basic sewing supplies (here’s a list of common sewing supplies, in case you need a few ideas)
-Since I was making slippers for kids, a 1/4 yard of each of the above fabrics was more than enough to make the slippers. I was even able to find craft foam cut into small squares on clearance that was just long enough for my kids’ feet.
–I liked the thickness of the foam slippers for kids’ slippers, but you could easily make them thicker. In that case I’d just go with 1 inch foam and use another “side” piece of fabric to go around the slipper (to accommodate the increased depth.)
***As always, if you need a bit of help with the basic sewing skills used in this tutorial, don’t hesitate to check out the Sewing 101 post for more help.
Alright, let’s get started.
Begin by making your pattern pieces. Using your child’s shoe as a guide, trace the bottom. You will add a seam allowance to this template when you cut from your fabric.

For the top of the slipper, I wrapped a piece of paper over the top of the shoe to estimate how the top should be. Then I cut a piece to match the curve of the front of the bottom part of the shoe.


Use the templates to cut out your pieces. Cutting one “right” side and one “wrong” side from your template will give you pieces for the left and right slipper respectively. For the ears, I just free handed the ear shape. I cut two pieces of felt per ear so that the ears stood up better on the slipper.
Cut out the foam to be the same size as the shoe bottom (without any seam allowance). Cut one for each foot (not shown below). Here are all of the pieces except the foam inserts.

Start by embroidering the face and sewing the ear front and back to each other (using a basic running stitch). (Here is a good resource for embroidery stitches if you are unfamiliar with embroidery).
I used a small piece of pink felt for the nose, and stitched that on as well.


Fold the ears edges over, and sew. This gives the ears a bit more dimension.

Now it’s time to incorporate the ears into the slipper front. Place the ears down on the face piece. Placing the right sides together, sew the outside of the slipper to the inner lining, incorporating the mouse ears into the seam at the same time.
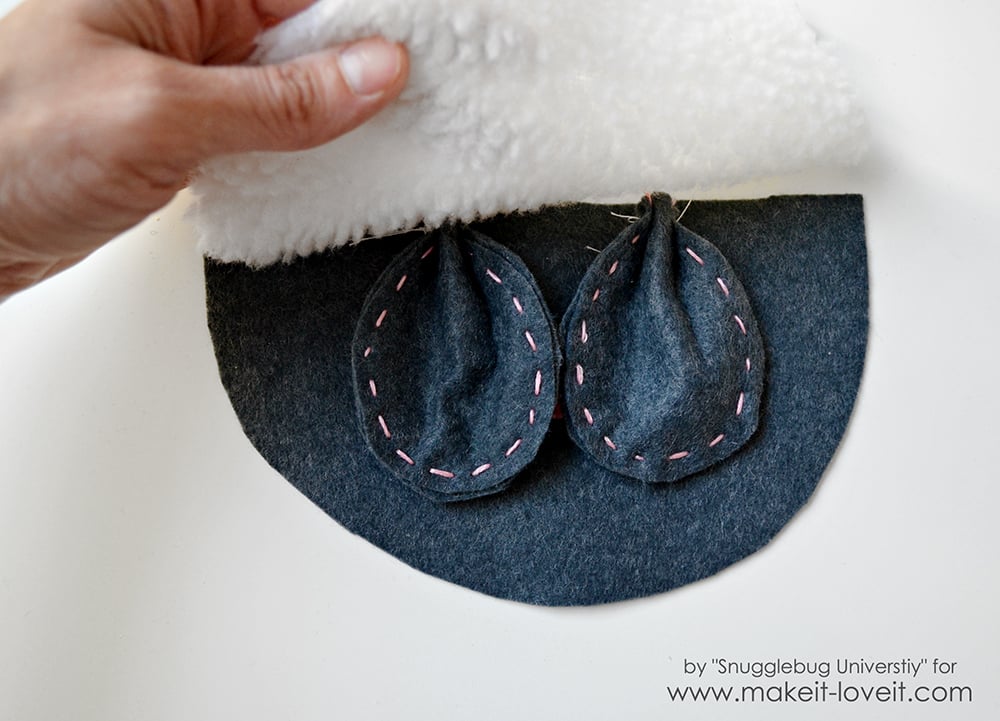

I turn my slipper right side out and top stitch right along the top of the slipper so that it sits nicely. Next, we’re going to sew the slipper front to the slipper lining and back.
Start by placing your the slipper front so that it’s sitting on the inside lining of the shoe. This is the same way your slipper will look when it’s finished.

You will need to fold your slipper a bit so that the ears don’t get caught in the side seams.

Now, place the bottom of the shoe on top of the mouse face part of the slipper. Sew around the edges, leaving the base open and avoiding catching the ears in your seams.

Clip curves and turn right side out. Put the foam in.

Fold in edges around the heel and sew around the edges, securing the foam in place.

And with that, you’re done with the first slipper and you can just repeat the instructions for your second slipper!

If you enjoyed this post and are looking for more homemade kid gift ideas, you can find over 30 different kid gift projects here on my blog, including these fairy dolls, this stuffed dog pattern, this making faces game, andthese puppets.

Thank you so much for having me here on Make It and Love It!
–Jill
No comments:
Post a Comment