Showing posts with label #alborj #sewing #machine #needle #thread #stitching #fashion #newlook. Show all posts

Thursday, June 16, 2016

What type of Thread to use


Just like finding the right fabric and the right needle for your patterns, finding out what thread to use is an important step to moving from amateur sewist to smart seamstress. When you truly know your materials well, you can begin to master the art. When it comes to the art of sewing that means knowing your fabric and knowing the types of thread you should be using as you begin to explore more and more sewing projects is going to save you from creating projects to rip or fall apart. Knit or stretchy fabrics, for example, need to be paired with a type of thread that has some give to it or else hems or edges may bunch up or the thread will rip. Luckily, What Types of Thread to Use: A Guide is here to give you the low down on sewing thread and where it goes.

The difference between figuring out what type of thread to use and what type of fabric to use really comes down to picking one before the other. If you know what fabric to use, it is actually pretty easy to pair your types of thread with your fabric. Cotton thread, for example, works well with cotton fabric. That’s easy enough to remember. Knowing what thread is what, however, is difficult as it is so thin and hard to really pin down on its own. This means it is very important to organize your thread once you’ve removed it from the packaging.
What Types of Thread to Use
Table of Contents


What Types of Thread to Use: General Rules
Types of Thread: Fabric Guide


What Types of Thread to Use: General Rules
When you are sewing something that is going to need a stretch (knits, spandex) or is a very durable fabric (leather, polyester), a polyester thread is going to be your best bet.
Cotton pairs best with cotton thread, but keep in mind that thinner cotton threads can break easily and do not come equipped with much stretch.
The thickness and weight of your thread is important to keep in mind, as well.


Types of Thread: Fabric Guide


Tuesday, August 11, 2015

Made in UAE | UAE BRANDS – FASHION FOR ALL SIZES AND SEASONS

UAE BRANDS – FASHION FOR ALL SIZES AND SEASONS


UAE Fashion Designers
UAE’s local fashion talent has created its impression, captivating fashion lovers with immaculate art works and stylish cuts. Trend setters and people who love to wear fresh ideas can continue to inspire, thanks to Dubai’s fashion designers.
There’s no better way to support local talent than by donning their made-in-the-UAE designs. And there are quite a few worthy of mention. For festival fashion-lovers, a kaftan by Neon Edge is just the thing for you. From bright coral reds to electric cobalt blues, its founder Mona Fares combines traditional silhouettes with intricate lace borders, which can be seen online at www.monafares.com. On the same festive note, for floral headwear, look no further than stylist Chloe Bosher’s home-grown brand, Dot Your T’s and Cross Your I’s, offering caps, headbands and cute cat-ear headpieces covered in beautiful flowers, sold at beachwear boutique Praias.
For style that’s bold but retains a feminine flair, you’ll love the latest tulle-trimmed maxi skirts and bell-sleeved crop tops by the local brand Dinz, founded by sisters Rima and Dina Zahran, who’ve expanded their brand into homeccessories – dinzboutique.com.
For directional fashion that’s ultra unique, look into Reemami, founded by the graphic illustrator Reema Al Banna. Her latest collection portrays women’s empowerment through boxing-glove motifs, and features a fringed skirt made purely from shoelaces, available through The Cartel gallery and boutique in Dubai.
If you’re one of those shoppers who always seems to be on a pattern high, on the lookout for the quirkiest of graphic prints, OTT, stocked at ValleyDez in Dubai, has it covered – from skirts flaunting faces of Audrey Hepburn to ponchos printed with poses by Elizabeth Taylor. For overcharged prints in a more cultural context, FMM by Fatma Al Mulla, known throughout the region for her fun phone cases, has a new line of tops, skirts and reversible kaftans, available at Ush Boutique in Dubai and Abu Dhabi.
It’s quite possible that the above brands are simply not to your taste. If that’s the case, you’re bound to bond with Ahmed El Sayed and Saleh Al Banna, the men behind House of Nomad, who made a much-talked-about debut at Dubai’s Fashion Forward last month. Their latest collection can be found at The Luxury Arcade in Abu Dhabi. Also noteworthy is the women’s wear label Lili.Aiya, a member of the new Dubai Design District’s “Resid3nt” community. Her tops and tunic dresses combine modesty and comfort with chic appeal and immaculate attention to detail. As well, the up-and-coming streetwear brand Juniors Be Junior has luxe loungewear and statement snapback caps on offer. Speaking of snapbacks, check out Mermaid by D, a local label that makes snapbacks embroidered with whimsical “mermaid” text, found at The Fashion Vault in Dubai.
For abayas that feature metallic pops, textured fabrics and a fun feminine flounce, see Bleach, at House of Fraser in Abu Dhabi, and for pieces driven by luxe minimalism and inspired by Emirati heritage, discover Anthropology of Design on its website anthropologyofdesign.com and at Resid3nt pop-ups.
With style, class and grace, these local labels are far more tempting than typical high-street ones. So, next time when you go out shopping, check out some of UAE’s local designers as well.


News reference link
http://www.dxbfashionfeed.com/uae-fashion-brands-for-all-sizes-and-seasons/

Thursday, August 6, 2015

Fashion-Inspired Rolls-Royce Wraith To Arrive in UAE

Fashion-Inspired Rolls-Royce Wraith To Arrive in UAE


Fashion-Inspired Rolls-Royce Wraith To Arrive in UAE
Rolls-Royce Motor Cars has unveiled ‘Wraith – Inspired by Fashion’, which is now available to order for Rolls-Royce customers in the UAE for a limited time through Abu Dhabi Motors and AGMC.
‘Wraith – Inspired by Fashion’s’ two-tone exterior color scheme of Andalucian white and arctic white offers a neutral setting for a choice of accent colors, namely Jasmine, Tailored Purple or Mugello Red. Wraith’s signature shoulder-line is accentuated deftly with the addition of a hand-applied feature-line in the chosen highlight color, alluding to the divergent interior of the motor car.
Like the finest Bespoke garments, beauty is found in the subtlest details. Upon opening Wraith’s coach-doors you will find a contemporary impression of the car’s classic Arctic White and Black interior color scheme. Beyond the traditional placement of embroidered headrests, seat stitching and piping, the accent color has found an elegant new application via a striking two-tone composition steering wheel. A seamless stitch, a highly complex craft technique from the world of fine tailoring, was mastered and applied to the wheel by the craftspeople in the Leather Shop at the Home of Rolls-Royce.
Fashion-Inspired Rolls-Royce Wraith To Arrive in UAE
The finest garments are crafted exclusively from the most luxurious materials. The bespoke design team took inspiration from this approach in appointing the car’s front and rear door pockets with fine silks, adorned with an abstract representation of the Spirit of Ecstasy with each emblem set precisely at fifty-five degrees to complement the lines of the door. The remarkable craftsmanship and attention-to-detail employed in the creation of any Rolls-Royce is evident in the exquisite application of wood to the dashboard, with the lacquering process for ‘Wraith – Inspired by Fashion’ alone taking nine days to painstakingly complete. This is completed elegantly with the integration of a Bespoke Clock, set as a piece of jewelry, styled exclusively to emit a pearl effect, reminiscent of silk fabrics.
The contemporary fashion theme is completed with the integration of welting, a specialist technique most commonly associated with Bespoke tailoring. Presented as a colorful silk strip, the welting stylishly frames Wraith’s signature leather door-panel. To mark the occasion of the creation of this timeless Wraith, the motor car took part in a landmark shoot on the production line at the Home of Rolls-Royce in the South of England. The luxurious materials and distinctive features presented in the motor car were accentuated by fashion models, set against a backdrop of the hand-made motor cars.
The success of the Wraith in attracting a new generation of successful entrepreneurs to the marque has been underpinned by a surge in demand for Bespoke personalization – a remarkable 95% of all Wraith motor cars left the Home of Rolls-Royce with an element of Bespoke design last year, giving bold expression to the notion that Bespoke is Rolls-Royce. And now, you can get yours here in Dubai. But hurry up before it is too late!

Monday, August 3, 2015

Fashion News: Ethan K presents the Doha Bag

Ethan K presents the Doha Bag

Ethan K The Doha Bag
Ethan K The Doha Bag 
Ethan K’s latest creation, The Doha bag. Inspired by a journey to Qatar, the exotic skin artisan took in 2014, it is the culmination of encounters with Royalty and his love for the East. Drinking karak tea at The Pearl, Ethan sat with one of his best clients, a member of the Qatari royal family. Inspired by her colorful personality Ethan sketched a special handle to emulate her gold bangles whilst the curve of the bag was inspired by shapes the ripples made on the Persian Gulf.
The Doha bag features a special octagonal turn lock made with semi-precious stones which symbolize luck and prosperity in Asian Culture and it can also be carried as a cross body.
Four creations have been designed exclusively for Harrods and each houses an 18ct gold dipped plate engraved with “Ethan K for Harrods”.

The Doha bag is available in:

– 22cm Tri Colour Crocodile: Mandarine Orange, Chocolate Brown and Rose
– 22cm Tri Colour Crocodile: Jackfruit Yellow, Purple Basil and Mandarine Orange
– 27cm Tri Colour Crocodile: Red Grapes, Chocolate Brown and Silk
– 27cm Bi Colour Crocodile: Calamansi Green and Purple Basil

Monday, July 27, 2015

The UAE’s Taller Marmo Wins the Woolmark Regional Prize

The UAE’s Taller Marmo Wins the Woolmark Regional Prize


“I didn’t think we would win—I mean I was confident in our work, but during the 15 minutes that we had to defend it, I was very nervous, and the judges were reserved,” explained Yago Goicoechea, who, along with Riccardo Audisio represent the duo behind UAE-based Taller Marmo. The duo took home the Woolmark International Regional Prize held last night at Vida Hotel, and simultaneously marked the first win for the UAE in the regional womenswear category (last year, The Emperor 1688 took the honors for menswear). Other finalists included Misha Lakhani and Sania Maskatiya of Pakistan; Akaaro, Suketdhir, and Nachiket Barve of India; Thamanyah and Bleach of the UAE; and Bashar Assaf and Mira Hayek from Lebanon.
Creating a collection inspired by the life of the late English explorer and archeologist Gertrude Bell, the designers featured pieces that intentionally opposed any preconceived notion of wool. “We didn’t want to do anything that was cozy, or made you think of sitting by a fireplace in your knitwear,” explained the designers. “And actually, everyone thought that this coat we produced was made with neoprene fabric.” The off-white outerwear was in fact made with a bonded wool fabric—85% wool and 15% polyamide— and weighed four kilos and 800 grams. It featured a cobalt blue lining that was in harmony with the mesh top that was previously awarded at the fabric trade show Premier Vision in Paris. The coat also featured a solid silver Merino goat head with South American raw emerald eyes fashioned by Italian jeweler Soldani & Bianchi.
In keeping with the idea of travel, and donning clothes suitable for all climes, the garments included details such as large pockets and unique hand-drawn white symbols hand-painted on the clothes. These drawings, which featured the likes of the evil eye and the lion paw (the latter being a symbol of strength and protection), marked a very strong connection between Merino wool and Berber culture, as discovered by Taller Marmo’s designers.
“Searching the origins of Merino wool, we learned that its name is related to the Marinid, a Berber dynasty, known to be shepherds and breeders of sheep, which ruled Morocco between 1244 and 1465,” Explained the designers. Berber rugs feature such symbols, which Audisio and Goicoechea chose to adorn the clothes as a nod to the brand’s Middle East positioning.
Both Taller Marmo and Suketdhir, the menswear finalists , will be given a financial prize of AED/SAR 136,112 along with the opportunity to represent India, Pakistan, and the Middle East at the international finals to be held in Florence, January 2016 (menswear), and New York, February 2016, where each will feature a fully produced capsule collection. The winner of the International Woolmark Prize will be awarded an additional AED/SAR 272,225 and will have the clothing stocked in Harvey Nichols (London), 10 Corso Como (Milan, Beijing, and Shanghai), Matchesfashion.com (online), Mytheresa.com (online), Saks Fifth Avenue (NYC), Joyce (China), Boutique 1 (UAE), and David Jones (Australia).

Sunday, July 26, 2015

The 90 minute Shirt | Al Borj

The 90 minute Shirt | Al Borj

It’s long for the winter and short for the summer.
It’s simple, it’s colorful, it’s The 90 Minute Shirt!
Taking a men’s T-shirt (or your own fabric), we’ll refashion it into this:
Needed: 
* Mens’ XL tshirt (or appx 3/4 to 1 yard of fabric)
* Appx 1/4 yard knit ribbing
* SERGER (optional. Makes for the best look but instructions included for sewing without)
Size used in this Tutorial: 2T
I call this the 90 Minute Shirt because I’ve made it so many times that I can do it 90 mins (and sometimes even in 60!) The first time you make it, it will take longer than 90 mins. Don’t feel ripped off. It took me longer the first (few) times. But over time, you’ll get the routine down and you’ll be cranking these out for all your little guys and gals!
It’s hard to “embellish” a boy’s shirt. So I love to use ribbing to spice things up. It’s subtle, but adds a pop. 
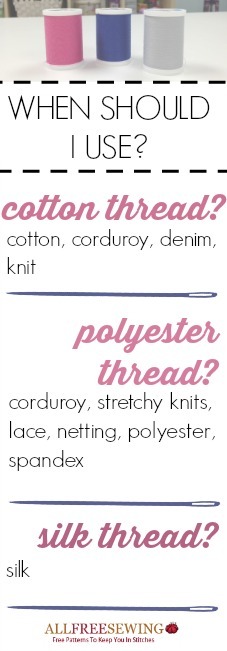
Ribbing is simply this: knit fabric you find in the fabric store with little ribs in it. That’s it! There’s often a variety of colors to choose from. I buy mine at Joanns and I usually get many different colors when they’re on sale (since they look so pretty together) and then I have options for whatever T-shirt I end up using. Of course you’ll only need about 1/4 yard (or less) for each shirt, so even if they’re not on sale, it’s pretty cheap. (If you don’t want to use ribbing, you can use fabric from another T-shirt or even the same shirt! Just use something KNIT, so it can stretch):
Now for your shirt fabric….
I love the concept of Refashioning or Upcycling something old. So for these shirts I often hit the local Thrift Store and buy a Men’s XL T-shirt. If you’re using new fabrics from a store instead, you will need appx 3/4 to 1 yard of knit fabric for a little boys shirt (1-2 years), depending on sleeve length. If you’re making something larger than that, take your pattern pieces with you to the store and figure out exactly how much fabric you need.
Once you’ve made your pattern pieces, using our Pattern Tutorial above, you should have pieces that look similar to this:
Prep your existing Men’s T-shirt by cutting off all the seams and laying it out flat. This orange shirt didn’t have a seam on the sides, so I had even more fabric to work with! Carefully cut off the sleeves. If you’re making short sleeves for your new shirt, you’ll want to use them!
Decide how to lay your fabric pieces to maximize your space. If you made pattern pieces similar to mine, REMEMBER that the shirt pieces are only HALF of the shirt, so you’ll need to trace part and flip it over and trace the other side.
BUT DON’T DO WHAT I DID AND TRACE DOWN THE MIDDLE. See those squiggly lines down there? you DON’T want to trace that part!! That’s the MIDDLE of your shirt! Yep, and I did it….
Look at this picture below. See the mess-up one in there? Thankfully I had enough fabric to make a new piece. LESSON LEARNED: if you think you’ll make this mistake too, make your pattern pieces FULL-sized shirt pieces.
If you’re going to use the hem of the existing shirt for your new shirt (which I LOVE to do. Saves time and looks cool), make sure your pattern pieces are placed along the bottom of the shirt. Don’t worry if your shirt is a bit wonky and bent out of shape. It works out in the end:
And if you’re cutting short sleeves (instead of the long sleeves above), use the hem of the existing sleeve as well. Just place your pattern piece right on the edge of the hem and cut out the new sleeve:
Measure around the neck of both the FRONT and BACK of the shirt pieces (they will be different lengths. The front neck scoops further down).
Add those two lengths together, and this is how long you need to cut your strip of neck ribbing. For my two shirt pieces combined, it was 27 inches long. Now the width of the neck ribbing is to your preference. 1 1/2 to 2 inches wide is good. The ribbing will be folded in half, around the neck, so keep that in mind. For the orange shirt I cut it 2 inches wide. For the Brown shirt, I did 1 1/2 inches wide.
If you’re adding a cuff to your sleeves, cut two cuffs just slightly larger on the sides that the bottom of your sleeve piece. And cut it 4 inches wide (or whatever width you like. The cuff will be folded in half when finished):
Now your pieces are prepped and ready to go!
The first sewing step is to prepare your ribbing pieces.
NOW IF YOU DON’T HAVE SERGER, DON’T FREAK OUT HERE. There will be more info below.
But for those who have a Serger, there are more proper ways for doing this, I’m sure. But if you’re like me, you find a way that works for you and continue to use it. So that’s what I’ll show you here. Using your serger, serge down both sides of your long ribbing strip. I like to use contrasting thread on my ribbing so it adds more color to the shirt:
It should look like this:
Do the same for both your cuff pieces:
Now, if you don’t have a serger….
Just leave all your edges raw. They won’t unravel (knit does not fray). The serging is really just to add decor. It’s not a necessary step. Your shirt won’t look quite as “decorated” but it’ll still be plenty cute. Just make sure that your edges are cut straight and even (a rotary cutter is best for that).
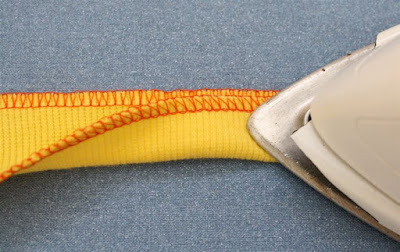
Okay, iron your long strip in half, with the back half just slightly higher than the front. This makes it easier to attach to your shirt later on (in the same way that store-bought bias tape is slightly wider on one side):
Then starting with your back shirt piece, sandwich the neck edge into the ribbing, with the longer side of the ribbing on the back (inside). This ensures that when you sew it on near the edge, it will definitely be sewn on the back too:
When you get to the end, just snip off the ribbing and use the remaining ribbing to go around the front pattern piece:
If you have a label for your shirt, insert it into the back, tucked into the ribbing and pin it in place:
Then, sewing on the OUTSIDE of your shirt (the side everyone is going to see), start sewing your ribbing on to the shirt. I sew two lines, one on the right side of my serged lines:
And the other line, near the left edge of the ribbing:
If you don’t have a serger, you will just sew two parallel lines. You can use a double needle for this (see your machine manual. You’ll likely need to purchase one), OR you can just sew two separate lines. I often do this. First, sew the line on the left, near the edge, using your presser foot as a guide so your line is “straight” with the fabric’s edge. Then sew your 2nd line about 1/4 inch to right of your first line. I often use that method for hems and other decorative sewing. When you’re done, it might not look as pretty on the inside, but no one’s going to see it much:
Another option for your shirt label is to add it to the back of the shirt. If you’re really lame like me and made the same mistake twice when tracing your pattern (SERIOUSLY), then you ended up with an unwanted Sharpie mark in the middle of you shirt. So…..I cut out a rectangle of ribbing, matching the neck ribbing, sewed my label on top, and sewed it right over the mistake spot.
An impromptu (and needed) design:
Okay, on to the sleeves…..
NOTE: if you don’t want to add cuffs, you can simply serge the edges of your shirt sleeves (and bottom hem of your shirt) or even leave them raw. In this tutorial, we’ll be adding cuffs.
* UPDATED NOTE* : The color of my sleeves have changed here because I realized an easier way to do them after creating this tutorial. So, the sleeves here are gray and the cuffs are white. We’ll pick up with orange sleeves again in the next step.

Okay……
With your cuffs serged on the sides (for decor, not necessary), iron them in half and get ready to sew them to the ends of each sleeve:
Sandwich the end of the sleeve right inside of the cuff:
Like this:
Then sew each cuff down (similar to how you did the neck line above):
Each sleeve bottom should look like this:
SEWING ON SLEEVES:
There are two ways to do this. 
This is the alternate method I use from time to time — you’ll find the info HERE.
(photos used on a beach robe, but the concept is the same)
And this is the method I learned years ago.
Decide which method works in your creative mind and go use that…..
With RIGHT sides together, fold the sleeve in half:
And sew down the entire side:
Serge off the seam (zigzag or leave raw):
Iron down your seam and you sleeves are done!
Pretty easy! Now let’s attach them to your shirt…..

NOTE: we are now back to the orange/yellow sleeve color :)
Okay, with RIGHT sides of your shirt pieces together, pin the sides down. We are ONLY sewing the sides right now:
If you have a side tag/label, insert it about 2 inches from the bottom of the shirt:
Sew down the sides of the shirt , serge them off, and Iron out your seams:
Okay, this part isn’t tricky but it’s hard to show visually. Now it’s time to sew in your sleeves and sew the top of your shirt closed. This is the final step. Yay! So, with your sleeve turned RIGHT side out (the way it will look when you’re done) and with your shirt INSIDE out, take the armpit seam of your sleeve and match it to the armpit seam of your shirt:
and pin it in place:
Then you start to wrap the shirt shoulders around the sleeve, one piece at a time. It always takes me a moment to remember which shirt side to wrap around first (the front or the back?) When your shirt is finished, the back shoulder will wrap around to the front. SO (though it will feel backwards to do it this way), start by pinning the BACK shirt shoulder around the sleeve first (if none of this is making sense, study how a onesie looks and it should help):
When you finish pinning the BACK shoulder side down, wrap the FRONT shoulder around and pin it to the sleeve also:
As you go around, it will start to overlap where you pinned down the BACK shoulder. Just take out the pin and pin the Front shoulder to it also.
When you’re done, it should look something like this:
Now before you sew it down, ALWAYS DOUBLE-CHECK that you pinned both arms down properly by turning the whole shirt right-side out slightly just to see that you have both sleeves with the BACK folding over to the Front. I’ve made the mistake before and had both sleeves going in different directions. Good thing I caught it before sewing!
If everything is good to go, sew the all the way around the sleeve. Turn your shirt Right side out again to make sure it looks good and then serge off the edges and iron out your seams:
And woohoo! You’re done! Go throw it on your little guy.
He sure looks cute, scrapes and all.
Other variations on the shirt….
(UNO image done by Freezer Paper Stenciling….Tutorial HERE. Image HERE.)


And that’s the 90 min shirt! How fast can you make a shirt?