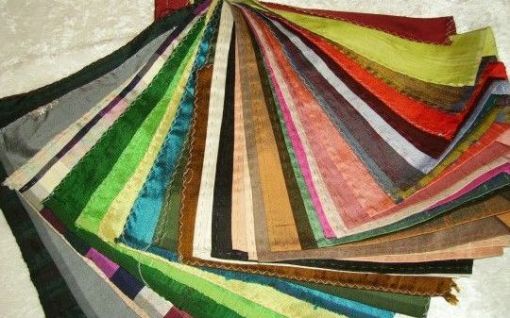
One big advantage of making your own clothes is that you can use better and more healthy materials as the synthetic ones so often used for abayas nowadays. If your surroundings are not very hot, you can get away with a good cotton, or even better, a nice linen. Linen is ideal, it can retain far more moisture as cotton, therefore it will be feeling cool. In a really hot environment a light silk would be the best choice. Silk is usually very expensive, but that is a market mechanism. To buy in bulk, a decent silk doesn’t cost much more as a good cotton. So do shop around! Because of it’s luxury reputation, the shops put a much larger margin on it, making it more expensive. It might also be a good idea to buy a cheaper undyed material, and dye it in the color of your choice. With delicate materials it is best to try a small piece first. Dupioni silk is usually fairly cheap, but it looks a bit stiff. I do like the rough texture though, and you can get it in all sorts of colors, and in pretty changeant weaves too.
Article & Copy Rights:
by thuriayaa
http://sewing4rlife.blogspot.ae
BUY Sewing/Embroidery machines / Software's from http://shop.al-borj.com
Fastenings:
You can use snaps, hooks, zippers, buttons or velcro, it is your own choice. Velcro may sound easy, but has spelled doom for many a pretty delicate shayla. I think the easiest option is buttons, and, instead of making the quite complicated buttonholes, make a loop, use a bit of nice ribbon, or cord. If you use a different color it will be a decorative feature.
Measurements of the patterns:
I can’t give exact measurements on these designs, you have to find out your own measurements. The measurements you need are in the drawing underneath. Instead of experimenting on some beautiful material, I suggest you buy some very cheap cloth, like an unbleached cotton, and stitch it loosely, or even just pin it together, try it on and make changes as you like. Once your try-out is to your liking, you unpin or pick out the stitching, and you can then use the pieces of material for your own perfectly fitting pattern.
If your pattern is precisely cut on your finished dress/abaya, make sure you allow an extra 1,5 cm for stitching and edging the material. I would not line an abaya, because you use it over your clothes in mostly hot countries, so to add even extra material would be even more suffocating. If you add a lining for effect you could choose to only line the bottom of your abaya or sleeves.
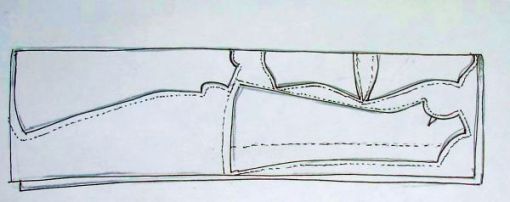
Above you see an example on how you could lay out the pattern on your material. lay out your pieces, and move them around until you have them placed as economically as possible. Note down how much material you need, handy to know, especially if you plan on buying an expensive material next time. Most cloth comes at a width of 1.50 meter. Some more exclusive materials are only 1,20 wide. In that case you can’t slip in the sleeves at the sides, and you need 2× your length, #5. And 1× your sleeve length, #2.
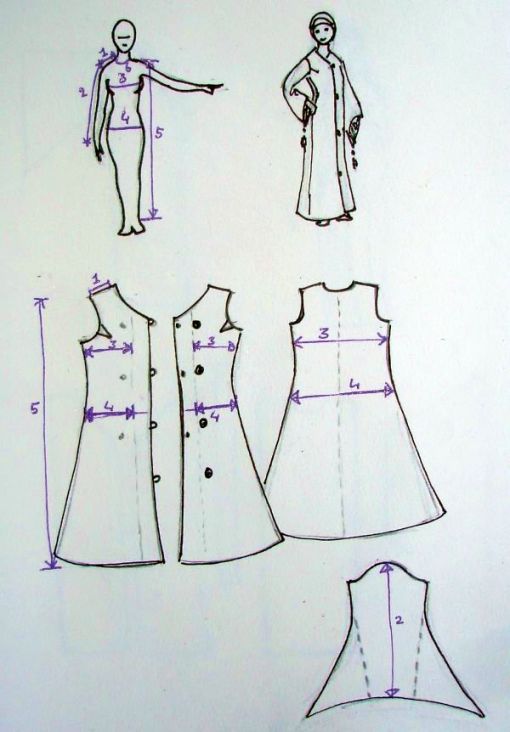
These are the measurements you need, work them out for yourself, and make a trial-abaya which you can unpick, or cut up, and use as your personal pattern. Draw the pattern on your real material with special tailor chalk. The sleeve on pattern #1 is a wide sleeve, but if you draw the line to the seam you get a fitted sleeve. This also shows how you can make variations, once you have a good pattern. I only use basic patterns myself, and chance them when drawing them with chalk on the material for the design of a specific garment I’m making.
Pattern #1 and #2 have an overlapping front. You can easily adapt #1 so it won’t overlap. If you use an overlapping front, you nee to put in at least two extra buttons or snaps on the inside, to keep the bottom layer of cloth from sagging down. On pattern #1 you can see three light doth which are sugestions for the inside buttons or snaps.
This second pattern is really a Japanese kimono. This is a véry simple pattern and should be well in reach of everybody who would like to try and make something. Simple forms are also a nice canvas for your own decorations.
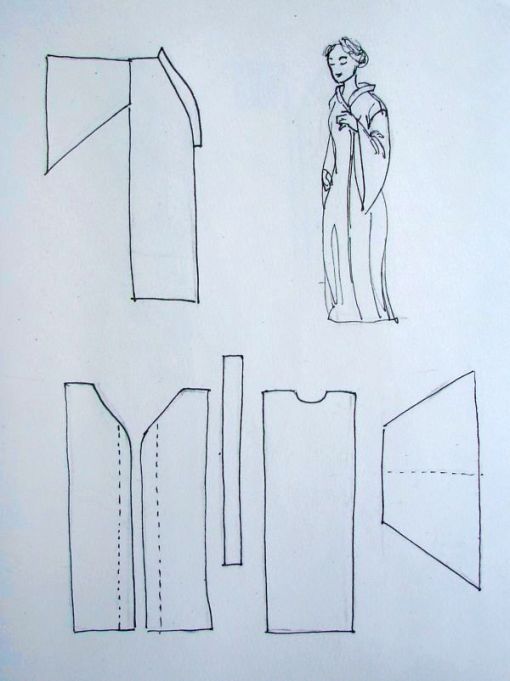
With the kimono pattern, you don’t have to be careful with the shoulder seam, it’s supposed to slip from the shoulder a bit. You can make a much wider kimono, by cutting the front and back-panels for a much wider shoulder, and then create three folds which you stitch for about 25cm.
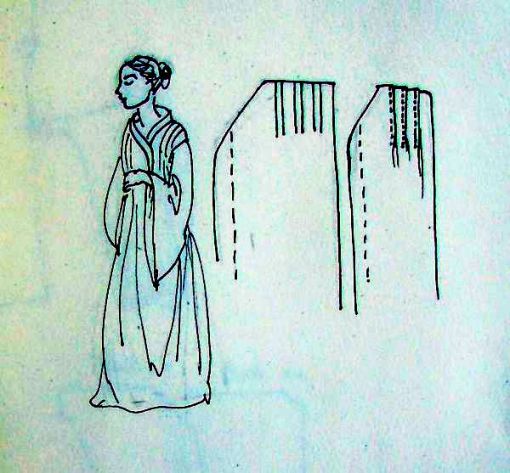
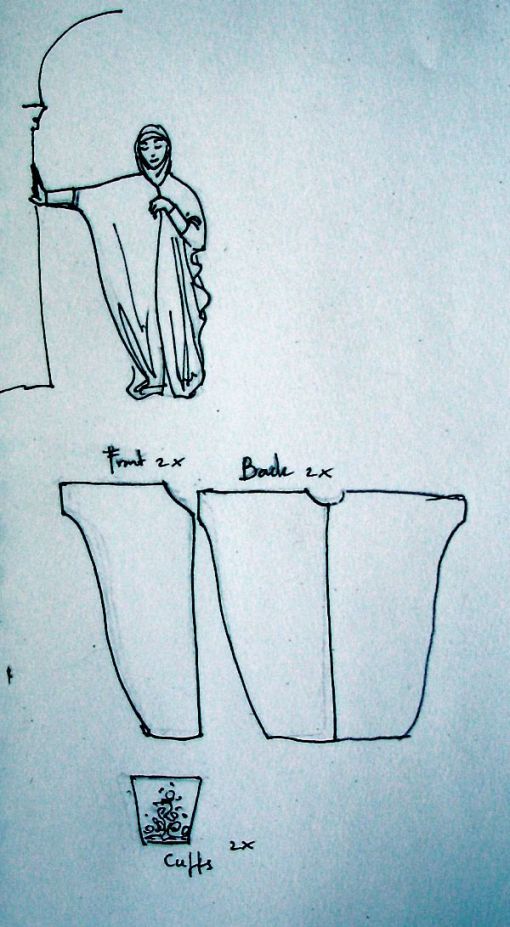
Pattern #3 is a very simple basic traditional butterfly design. Not handy in daily life, but very pretty. You can decorate the sleeve cuffs, or even make them of a different material. Like a Chinese brocade.
Once you have tried making one of these, experiment with different cuts, or try your hand at adding some nice decorations. In part 2 I will give some ideas for decorating your abaya. (or anything else)
Article & Copy Rights:
by thuriayaa
http://sewing4rlife.blogspot.ae
BUY Sewing/Embroidery machines / Software's from http://shop.al-borj.com

Fastenings:
You can use snaps, hooks, zippers, buttons or velcro, it is your own choice. Velcro may sound easy, but has spelled doom for many a pretty delicate shayla. I think the easiest option is buttons, and, instead of making the quite complicated buttonholes, make a loop, use a bit of nice ribbon, or cord. If you use a different color it will be a decorative feature.
Measurements of the patterns:
I can’t give exact measurements on these designs, you have to find out your own measurements. The measurements you need are in the drawing underneath. Instead of experimenting on some beautiful material, I suggest you buy some very cheap cloth, like an unbleached cotton, and stitch it loosely, or even just pin it together, try it on and make changes as you like. Once your try-out is to your liking, you unpin or pick out the stitching, and you can then use the pieces of material for your own perfectly fitting pattern.
If your pattern is precisely cut on your finished dress/abaya, make sure you allow an extra 1,5 cm for stitching and edging the material. I would not line an abaya, because you use it over your clothes in mostly hot countries, so to add even extra material would be even more suffocating. If you add a lining for effect you could choose to only line the bottom of your abaya or sleeves.

Above you see an example on how you could lay out the pattern on your material. lay out your pieces, and move them around until you have them placed as economically as possible. Note down how much material you need, handy to know, especially if you plan on buying an expensive material next time. Most cloth comes at a width of 1.50 meter. Some more exclusive materials are only 1,20 wide. In that case you can’t slip in the sleeves at the sides, and you need 2× your length, #5. And 1× your sleeve length, #2.

These are the measurements you need, work them out for yourself, and make a trial-abaya which you can unpick, or cut up, and use as your personal pattern. Draw the pattern on your real material with special tailor chalk. The sleeve on pattern #1 is a wide sleeve, but if you draw the line to the seam you get a fitted sleeve. This also shows how you can make variations, once you have a good pattern. I only use basic patterns myself, and chance them when drawing them with chalk on the material for the design of a specific garment I’m making.
Pattern #1 and #2 have an overlapping front. You can easily adapt #1 so it won’t overlap. If you use an overlapping front, you nee to put in at least two extra buttons or snaps on the inside, to keep the bottom layer of cloth from sagging down. On pattern #1 you can see three light doth which are sugestions for the inside buttons or snaps.
This second pattern is really a Japanese kimono. This is a véry simple pattern and should be well in reach of everybody who would like to try and make something. Simple forms are also a nice canvas for your own decorations.

With the kimono pattern, you don’t have to be careful with the shoulder seam, it’s supposed to slip from the shoulder a bit. You can make a much wider kimono, by cutting the front and back-panels for a much wider shoulder, and then create three folds which you stitch for about 25cm.

Pattern #3 is a very simple basic traditional butterfly design. Not handy in daily life, but very pretty. You can decorate the sleeve cuffs, or even make them of a different material. Like a Chinese brocade.
Once you have tried making one of these, experiment with different cuts, or try your hand at adding some nice decorations. In part 2 I will give some ideas for decorating your abaya. (or anything else)


