
Sometimes, it is hard to find the exact zipper needed in your for a project. So, I thought it would be fun to share an easy trick for reducing zippers. But first, let’s explore the anatomy of a nylon zipper.
When trying to reduce the size of a zipper, it is important to understand all the working “parts”. (aka- zipper anatomy) This will help keep you out of trouble later.
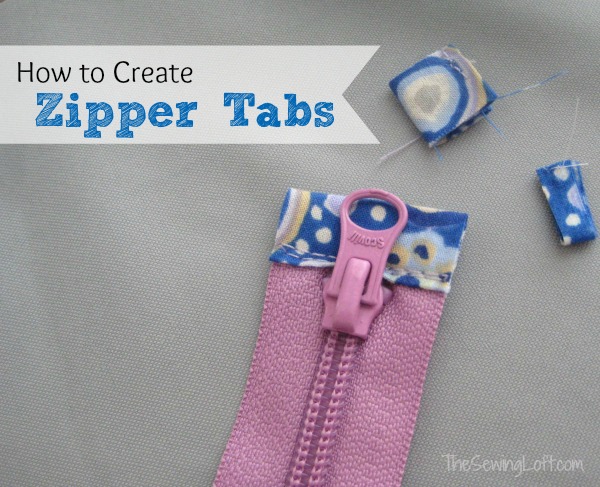
How to Create Zipper Tabs
This project is for all levels.
Skill Level- 1 Button
Supplies:
zipper
2 1/2″ x 4″ rectangle of woven fabric
Tools:
sewing machine
pins
scissors
iron and ironing board
Basic Instructions:
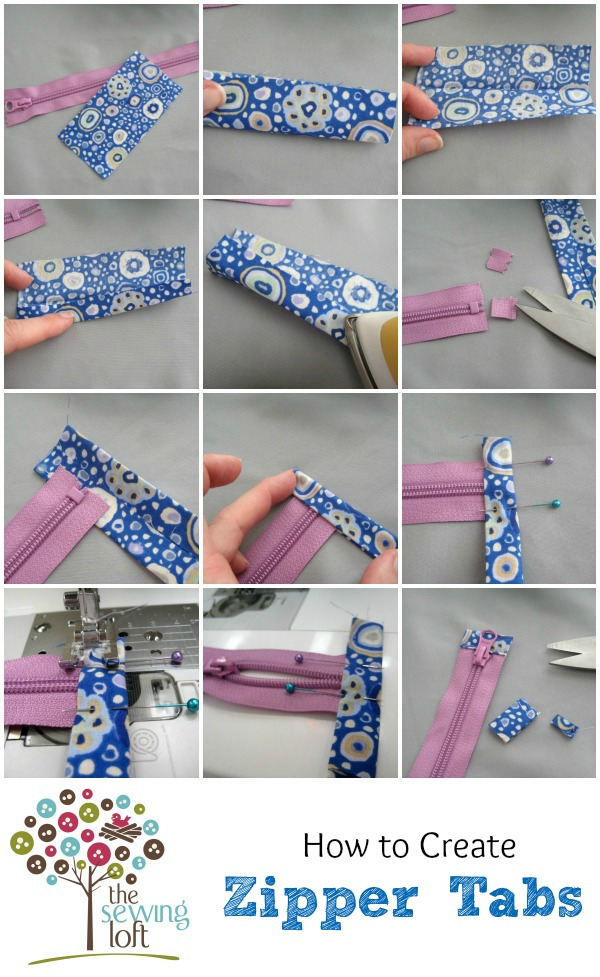
Fold and press fabric rectangle in half lengthwise to expose the “pretty” side of fabric.
Open it back up and fold each side to the center; press.
Trim the ends of the zipper tail to just below the “stopper”. *Note do not cut off the bottom stopper!
Slip the zipper end in between the folded fabric to create a sandwich. Pin in place.
Straight stitch along the edge. Trim off ends of fabric from zipper tab.
Open zipper slightly and repeat steps 3 & 4. Be sure to line up the zipper straight across the top opening before attaching the zipper tab.
Additional Notes:
Go SLOW when stitching over the coil part of zipper. If the needle hits the zipper coil too fast it could snap and break.
Consider stitching the fabric twice for security.
Zipper tabs are the perfect little detail for small pouches. Sometimes, even if the zipper is the right size, I will make it smaller just to add the tabs. I just love the added punch of color! Interested in putting your new sewing skill to the test? Then you won’t want to miss my zipper pouch round-up. This round-up includes some of the cutest free tutorials on the web.
credit: thesewingloftblog.com
When trying to reduce the size of a zipper, it is important to understand all the working “parts”. (aka- zipper anatomy) This will help keep you out of trouble later.
How to Create Zipper Tabs
This project is for all levels.
Skill Level- 1 Button
Supplies:
zipper
2 1/2″ x 4″ rectangle of woven fabric
Tools:
sewing machine
pins
scissors
iron and ironing board
Basic Instructions:
Fold and press fabric rectangle in half lengthwise to expose the “pretty” side of fabric.
Open it back up and fold each side to the center; press.
Trim the ends of the zipper tail to just below the “stopper”. *Note do not cut off the bottom stopper!
Slip the zipper end in between the folded fabric to create a sandwich. Pin in place.
Straight stitch along the edge. Trim off ends of fabric from zipper tab.
Open zipper slightly and repeat steps 3 & 4. Be sure to line up the zipper straight across the top opening before attaching the zipper tab.
Additional Notes:
Go SLOW when stitching over the coil part of zipper. If the needle hits the zipper coil too fast it could snap and break.
Consider stitching the fabric twice for security.
Zipper tabs are the perfect little detail for small pouches. Sometimes, even if the zipper is the right size, I will make it smaller just to add the tabs. I just love the added punch of color! Interested in putting your new sewing skill to the test? Then you won’t want to miss my zipper pouch round-up. This round-up includes some of the cutest free tutorials on the web.
credit: thesewingloftblog.com
No comments:
Post a Comment