
How to Use Seam Ripper

With all the cool and clever tutorials shared on The Sewing Loft for NSM, surely a few sewing mistakes have been made. So this tutorial is all about undoing some of the cool things you’ve sewn while sewing along with TSL this month.
You can use seam rippers to:
Undo mangled messes of thread (like when your bobbin starts acting up or your tension is not set right)
When you sew the two inch opening closed on accident (when you were suppose to leave it open)
Or you just don’t like the seam
Steps for using a seam ripper:
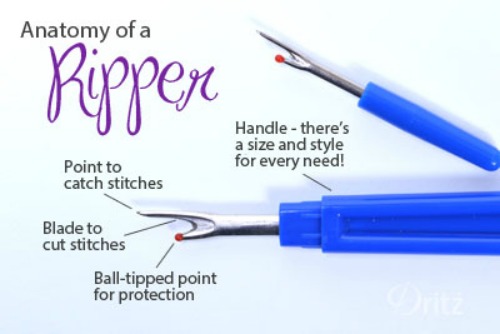
Lay the seam flat. Locate the part of the seam you want to remove and insert the pointed end of the ripper under the thread. The curve in the seam ripper is the part that will cut the thread.

Once you have cut one stitch, remove the ripper and continue the previous step for every two to four stitches, depending on how tight or loose your stitch is.

Remove the cut thread to reveal your opening.

Now you can continue with your sewing project and no one will ever be the wiser!
I have multiple seam rippers stashed throughout my sewing area. So confession time… how many seam rippers do you have? I won’t assume that the number of seam rippers you own is proportional to your sewing blunders!
Join the Craft Snob Facebook group to download your free pattern set.
If you are new to sewing, then follow Bite Sized Sewing, a series of free patterns and tutorials for the beginner sewer.
Thanks to The Sewing Loft for allowing me to celebrate National Sewing Month with all of you!
credit: thesewingloftblog.com
No comments:
Post a Comment